3. Creating a Wire Element
Let us create a wire element in the antenna model.
Click on the plus button of under the spreadsheet table in the "dipole" window.
Notice that cocoaNEC has created a new row in the spreadsheet for you, with the leftmost column showing an element number of 1.
The plus button has a hidden contextual menu. You can right-click (or control-click) on it to select other kinds of elements (such as arcs and helixes). The most often used element, i.e. a straight wire element, is created by left clicking on the button, as you have done above,
To proceed, double click on the cell in the selected row under the first "x" column.
Notice that cocoaNEC now activates the Cell Editor above the spreadsheet, and the caption just to the left of the cell editor changes from "Edit:" into a red "x1:" indicating that you are in the process of editing the first "x" field.
Type a 0 (zero) into the cell editor.

When you hit return on the keyboard, the 0 in the Cell Editor will be transfered to the spreadsheet cell, and the caption of the Cell Editor returns to "Edit:" indicating that the cell editor is no longer active, as shown below:

The Cell Editor contents is actually a formula. Once you exit from the cell editor, the value of the formula is converted to a plain number by an expression evaluator and deposited into the spreadsheet cell that is visible to you. This is the same behavior of many common spreadsheet programs, such as the one in AppleWorks.
To test the behavior of the expression evaluator, double click on the "y" cell that is next to the "x" cell. The caption of the Cell Editor should now appear as "y1:" in red.
Type 5.5+7 into the cell editor. When you hit return, notice that the "y" cell in the spreadsheet changes to 12.500 (the sum of 5.5 and 7).
Double click on the "y" cell again and you will see the original formula (5.5+7) again reappear in the cell editor. This demonstrates that the visible spreadsheet cell simply displays the evaluated value of the "hidden" formula for that cell.
Now select the "y" cell again, and replace the contents of the cell editor so that it now reads 7' . Notice the foot symbol (the single quote) after the 7, indicating we want the value to be 7 feet.
Hit return.
Notice that the visible spreadsheet cell changes to 2.1336, which is the value of 7 feet in meters.
If you now change the cell editor to 6", the spreadsheet cell will evaluate to 0.1524 meters (the metric equivalent of 6 inches).
At this point, notice that there is a popup menu towards the right and under the spreadsheet table, that is labeled Display:. This menu is defaulted to Metric when you open a new spreadsheet window.
If you now select English-decimal from the menu, you will notice that the spreadsheet cell for "y" changes to 0.5000 ft, the value of 6" in feet.
If you select English-mixed, the cell will now read "6.0 in."
Finally, select the Cell Editor again for the "y" cell and enter "-elem" (don't forget the minus sign), like so:

If you remember, we had earlier assigned a value of 5 to a variable called "elem".
If you hit return in the Cell Editor, you will notice that with the display set to English-mixed, the cell in the spreadsheet shows -16' 4.9", which is the distance of minus 5 meters in mixed English units.
Changing the display units to be English-decimal will result in the cell reading "-16.40 ft".
If you change the display units popup menu to Wavelength, the -5 meters will read out as -0.2348 which is the value of -5 meters relative to the wavelength of the currently set frequency of 14.080 MHz.
14.080 MHz is the default frequency when you create a new model. You can change the analysis frequency in the Environment window.
Before proceeding further, set the display units back to meters, and verify that the "y" cell of the spreadsheet now contains -5.000.
Let us continue to complete the wire description. Double-click on the z column that is right next the the y1 cell, and type "height" into the cell editor, and hit return, and you will see this:

Remember that you had previously set the value for the "height" variable to 40 feet? 12.192 meters is simply 40 feet in the metric system. If you change the display menu to temporarily read out in feet, you will see that the cell indeed evaluates to 40 feet.
You can combine variables in formulas. For example (height+1) would evaluate to 13.192 meters (40 feet + 1 meter) whereas (height+1') would evaluate to 12.496 (15 feet).
A formula can be more complex. For example
(height+1)*0.5
A formula can also include trigonometric, hyperbolic, logarithmic and exponential functions, for example
sin( height*3.1415926 )
Getting back to defining the wire element, click on the second x cell (it will show up as x2 in the caption of the cell editor) and set the value to 0, next set the y2 cell to "elem" and finally set the z2 cell to "height."
The spreadsheet should now look like this:

We have just defined a wire that stretches from (0, -5, 12.192) to (0, 5, 12.192 ) in the cartesian coordinate system. That is, we have a wire that is 40 feet up in the air with the two arms reaching out plus and minus 5 meters from the center in the y dimension.
We still have two more parameters that we need to set for the wire. One is the radius of the wire and the other is the number of segments you want NEC-2 to chop the wires up into for analysis. In general, more segments will yield a more accurate reading, until the segment length approaches the diameter of the wire -- so don't use too many segments. More segments will also cause NEC-2 to compute for a longer time.
Select the radius cell and enter #14 into the cell editor. This tells cocoaNEC to use the radius of a number 14 AWG (American Wire Gauge) wire. You can always specify the wire radius in meters or inches, but a wire gauge is often quite convenient.
Finally, select the segments cell and set its value to 21. The result should look like this:

Because of a limitation in the underlying NEC-2 engine that cocoaNEC uses, the number of segments cannot be 1 when the wire also carries an excitation or load. cocoaNEC will warn you when that happens.
Notice that cocoaNEC has switched the wire radius to use millimeters since it is easier to visualize the smaller dimension than if it were displayed as 0.000814 meters.
Instead of selecting a new cell each time with a double click, you can use the tab key to complete the formula in the Cell Editor and move on to the next cell to the right of the cell that you were editing. The red caption of the Cell Editor changes to show the name of the new cell.
The remaining two columns of the spreadsheet are described in the Ref. Manual II. Suffice it to mention for now that the * column is used to temporarily ignore the particular row of the spreadsheet, and the name column is used to identify elements that you wish to connect together with transmissions lines.
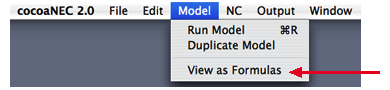
You can view the formulas themselves, instead of viewing the evaluated numbers. To do that, pull down the Model menu in the menu bar, and select View As Formulas. When viewing spreadsheet cells as formulas, the menu item will change to View as Numbers, so you can switch it back.
Next: Feeding the Antenna...