
cocoaNEC 2.0 Reference Manual (Section 3)
Spreadsheet Interface
Kok Chen, W7AY
[w7ay (at) arrl (dot) net]
Last updated: January 10, 2011
Spreadsheet Interface
If you select New Model (or Command N) in the File Menu, cocoaNEC will open a new spreadsheet window with the name Untitled Antenna-N, where N starts with 1 for the first window that you open.
If you select Save in the File Menu while a
spreadsheet window is still untitled, cocoaNEC will use the
same mechanism as a Save As... .
Save As... presents you with a Save File dialog
for you to select the folder and file name to save the
model to. The model is saved as a file that can be opened
using the Mac OS X Property List Editor (the Property List
Editor application should be on the Developer Disk that
came with the Mac OS X disk set). The default extension for
a model file is '.nec'.
If the spreadsheet window has previously been saved, or you
have opened the window from an existing .nec file by using
the Open Model menu item, Save will
update the model file without prompting with a dialog.
The spreadsheet comes with some auxiliary windows (Environment, Variables, Transforms, Networks, Output Control) in the form of
sheets that drop from the title bar of the window. You
can open the sheets using the row of four buttons
towards the bottom left of the spreadsheet window.
Subsequent sections will discuss the sheets in detain.
You can navigate to them by using the second row of tab
buttons at the top of this page.
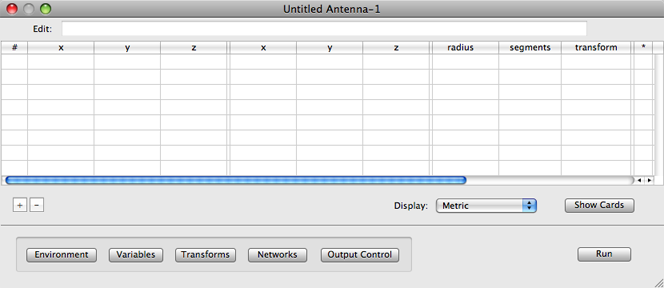
Spreadsheet
The spreadsheet at the top half of the spreadsheet window
is where you specify the geometry of the antenna.
As with the case of the Variables table, you add
and remove elements of the antenna by using the
+ (plus) and - (minus)
buttons below the table.
The + (plus) button has a contextual menu to add elements
other than a simple wire. But by right clicking (or
control-clicking) on the button, you can bring up the
contextual menu to select which type of element geometry to
add:
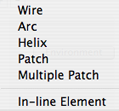
If you left click instead of right click on the + (plus)
button, the new element will default to the Wire element.
When a new element is created, the new spreadsheet row will
be empty except for the column that is under the # symbol.
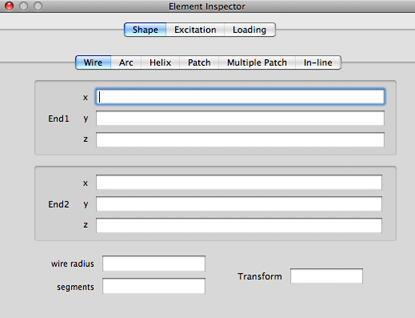
You can bring up the Element Inspector window for
any element by double clicking on its number in the #
column. The following figure shows the Shape (geometry)
panel of the Element Inspector:
You can also open the Element Inspector for a wire by first
selecting its row in the spreadsheet (a single click on the
spreadsheet row) and then going to the Window menu in the
Menu Bar and selecting Open Element Inspector (or
using the Command-E keyboard shortcut).

A wire's "shape" has two endpoints, each with an (x,y,z)
cartesian coordinate. It also has the radius of the wire
and the number of segments you are assigning to this
element. Each of these field will take a formula.
Notice that when you enter a formula into one of the fields
in the wire element geometry (remember to hit the return
key when you are finished with the formula), the evaluated
value of the formula will appear in the corresponding
column in the spreadsheet.
As an additional short cut, you can also edit the wire
parameters directly from the spreadsheet without opening
the Element inspector.
If you double click on a wire element's cell in the
spreadsheet, cocoaNEC makes a copy of its formula and
places it into the Cell Editor that is above the
spreadsheet. The following figure shows an inactive Cell
Editor:

The following figure shows an active Cell Editor after the
"z" cell of the first endpoint of the wire is double
clicked:

Notice that the Cell Editor's caption turns from "Edit" to
a red "z1" indicating that the editor is actively editing
the z component of the first endpoint of the wire. When you
finish editing by hitting the return key, the evaluated
value of the formula will appear in the spreadsheet cell,
and the Cell Editor formula will be transferred to the
cell's formula in the Geometry Inspector.
Please note
that this direct editing feature is only available for wire
elements. For other types of elements, you can only
edit the element's parameters from its geometry inspector.
For these other element types, only the type name of the
element appears in the spreadsheet, as seen below for a
spreadsheet that has one wire element and one arc element:

The except is the transform column. You can always
directly enter a Transform variable by directly
selecting its cell (you can of course enter it in the
Element Inspector of the element).
Units
Both cocoaNEC and NEC-2 keep the dimensional information in
meters.
When the numbers are evaluated from their formulas and
displayed in the spreadsheet cells, you have the option of
displaying it in Metric units
(default), in English units,
in mixed
English units or as a fraction of a wavelength. This
is done by selecting the units in the Display menu that is
below the spreadsheet. Notice that this does not affect how
you have entered the formula nor the internal
representation, it only affects the displayed result.
With the Metric display, the numbers will appear
in meters. If the numbers are small, they will appear in
centimeters and you will see a "cm" after the number. If
the numbers are even smaller, they will appear in
millimeters, with a "mm" after the number.
In English units, the number will appear as
decimal numbers of either feet or inches. Small numbers
will appear as inches. The numbers will have "ft" or in"
after them.
In Mixed English units, the numbers will appear as
an integer in feet, and if there is a fraction leftover, it
will appear as a decimal number in inches. For example, a
value of 12.54 feet in English units will appear
as 12' 6.5" in Mixed English units.
Finally, you can display the numbers in units of the
current wavelength, where the wavelength corresponds to the
frequency that is defined in the Environment
window.
You can switch between displayed units at any time and
cocoaNEC will recompute and refresh the cells in the
spreadsheet for you. If you change the frequency in the
Frequency field, cocoaNEC will also update the spreadsheet
cells. cocoaNEC will also recompute and refresh the display
when you change any of the variables in the Variables
table.
Run
When the Run button is clicked, cocoaNEC will
generate the NEC-2 input deck for the model that you have
entered. The geometry elements in the spreadsheet, the
variables in the Variable table, the frequency and ground
parameters in the Environment window, the networks that are
defined in the Network window and the output parameters in
the Output Control window all affect what gets generated
for NEC-2.
The "deck" is sent then to the NEC-2 engine for processing.
cocoNEC then extracts the results from the output from
NEC-2 and opens the Output Window to display them.
You can also run the active model by selecting Run
Model (command R) in the Model Menu instead of using
the Run button. If there is more than one model
window open, the active model is the model whose window is
active,
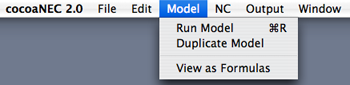
View as Formulas
When you enter a formula into a spreadsheet cell, it will
show up as the evaluated number. You can look at the
spreadsheet as cells of formulas instead, by selecting the
menu item from the Model menu (seen in the preceding
figure). The figure below shows a spreadsheet when viewed
as formulas.
