
cocoaModem 2.0 User's Manual
version 0.88
Kok Chen, W7AY
[w7ay (at) arrl
(dot) net]
Last updated: August 8, 2010
Index (User's Manual)
General Information
- Software Requirements
- Hardware Requirements
- Files
-
Audio (sound) Devices
- Turning a Sound Device on or off
- NetAudio Devices
- Aural
Monitor
- Accessibility
(Incremental Speak and Voice Assist)
-
Preferences
- Selecting cocoaModem Interfaces
-
Information Panels
- Text Attributes and Copying Texts in Text
Views
- Watchdog Timers
- AppleScript
-
Keyboard Shortcuts
PSK Interface
MFSK Interface
Hellschreiber Interface
CW Interface
SITOR-B Receiver
HF-FAX Receiver
Synchronous AM Receiver
Versions
Part II
General Information
This section of the manual contains information that is common for all cocoaModem modes and interfaces. The section describes requirements, user preferences, macros, AppleScripting, etc. Later sections describe mode specific information.
You can jump directly to one of the other sections (RTTY, PSK, etc) of the manual by clicking on the name of the section right under the navigation tabs at the top of this page. You can also go through the index that is present at the top of each section of the manual.
Software Requirements
cocoaModem 2.0 is designed to run on Mac OS X 10.4.x (Tiger) or newer versions of Mac OS X.
The disk image with the cocoaModem installer can be found in the Downloads page. You can go there by selecting the Downloads tab on top of this page.
cocoaModem is built as a Universal Binary. The application that you install from the downloaded disk image runs natively whether you are using a newer Intel-based Macintosh or an old PowerPC-based Macintosh. cocoaModem is localized for Japanese Mac OS X (by JF1WWZ). The PSK31 interface can also transmit and receive in Japanese and interoperate with other programs that uses Shift-JIS Double Byte encoding.
You can find old versions of cocoaModem which work on MacOS X 10.3 (Panther) or 10.2 (Jaguar) in the Downloads page. The Panther version has its own manual and does not support some of the features mentioned here. Both the Panther and Jaguar versions are no longer maintained nor updated, but remains downloadable if you have an older computer.
Hardware Requirements
cocoaModem needs to receive audio signals from the transceiver and send audio signals to the transceiver. In addition, the transceiver must be capable of being keyed into a transmit state when audio is present (VOX) or through additional push-to-talk hardware. Please refer to the Interfacing section and the subsections on Audio Interfaces and Push-to-Talk.
Files
When you install cocoaModem 2.0, four files will be downloaded to your machine.
The cocoaModem 2.0 application will install into your computer’s /Application folder. Three frameworks (a framework is a special bundled folder which contains shared, dynamic libraries and resources) will be downloaded into the computer’s /Library/Framework folder -- the three cocoaModem frameworks are AudioInterface.framework, CoreFilter.framework and CoreModem.framework.
After you run cocoaModem, it will save your preferences into a preference file. See the plist section below for a more detailed description.
When you customize a contest, each template will also generate a file. That will be discussed in the Contesting section of the manual.
In addition, files in the Library/Application Support/cocoaModem of your home directory can be used to extend the functionality of cocoaModem. Currently, the only extension is a file named Morse.txt that allows specialized codes to be included. See the CW section for more details.
Audio (sound) Devices
If you have multiple audio devices on your computer, you can select the same device for all the cocoaModem modes, or you can select a different device for each mode in cocoaModem. You can also choose to use one device for input and a different device for output. You can even use the left channel of a stereo device in one mode and the right channel of the same stereo in a different mode.
Audio Device Selection
Devices are selected in the Config Panel of each mode. To open the Config panel, first select one of the cocoaModem interfaces. Pull down the Window menu in the Menu bar, and pick Config. You can also open the Config panel with the keyboard shortcut Command-option-comma.
The input and output devices
for some of cocoaModem's interfaces are kept in separate
tabbed views of the Config panel. For these cases, an
example is the RTTY Config panel shown below, click on the
Receiver tab to select the Input device and click
on the Transmitter tab to select the Output
device.

If you have problems with finding an audio device from
cocoaModem, a good place to start diagnosing the problem is
to open System Preferences and select Hardware > Sound
and navigate into either the Input or Output tabs. If a
device is not listed in those panels, cocoaModem will not
find them either.
Another place to look for the presence of an audio device
is to use the Audio Midi Setup
application that is in the /Applications/Utilities folder.
If Audio Midi Setup cannot find a device, cocoaModem will
also not find it.
Some external sound devices will require non-standard sound
drivers that are not prebuilt into MacOS X for them to work
on your computer. Check with the manufacturer.
Selecting the Input
Device
The typical input section of the Config panel has a row of
popup menus together with a spectrum/oscilloscope display,
as seen in the figure below.
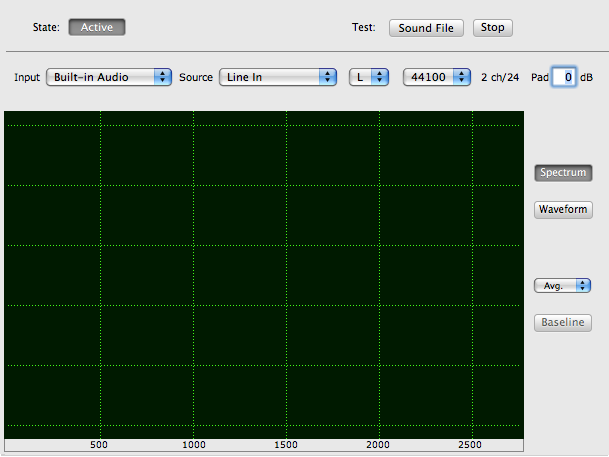
Figure 1 -
Input Device Selection
The input device is selected
using the Input popup menu shown at the top left
of the panel. In the figure above, the Macintosh’s
Built-in Audio is shown as the selected device.
Some audio devices have more than one source. The source is
selected with the Source popup menu to the
immediate right of the Input Menu. Typically, the Built-in
Audio device would have sources named Internal
Microphone and Line In. This menu will be
grayed out if the device supports only one source.
cocoaModem uses both (stereo) channels of an audio device
when it is available. Note the channel popup menu that is
just to the right of the source menu. The menu can be
selected to use either the L (left) or R (right) channel of
a stereo pair.
By convention, the left channel of a stereo pair is wired
to the “tip” of a stereo plug/jack. Notice that
a cable with a mono plug will short out the right channel
of a stereo jack, thus the usual convention is to use the
left channel in a stereo pair when you need a single
channel out of a stereo jack rather than forcing a mono
plug into a stereo jack. If you are unsure of the
connections found in a stereo jack, you can find the
tip/ring/sleeve nomenclature here.
To the right of the channel popup menu is a popup menu for
selecting the sound card sampling rate. cocoaModem allows
you to select between sampling rates of 11025, 16000,
32000, 44100, 48000 and 96000 samples/second. Not all sound
cards will support all six of these rates; cocoaModem
displays only the sampling rates hat are supported by the
device.
To the right of the sampling rate menu is a text field that
displays the number of channels and the bit depth that the
device supports.
The figure below shows a different input device -- in this
case, a popular external USB audio device manufactured by
Griffin Technology called the iMic. The device reports that
it has 2 channel, with a bit depth 20 bits. Newer versions
of the iMic only support 16 bits (see Appendix B of
Part II of the User’s manual
for details). This iMic has only a single source,
therefore the source menu is grayed out. Notice that the
right channel of the stereo pair is shown selected, with
a sampling rate of 11025 samples/sec.
![]()
Figure 2 -
Right channel of iMic
Finally on the right, there is
an input pad field that allows you to select a fixed
attenuation if the device supports a software setting for
the input gain.
As seen in Figure 1 above, there is a
waveform/spectrum display below the Input Menus that
shows the signal from the currently selected device.
This display is active even if the modem itself is not
active.
To the right of the display is a popup menu that initially
shows Avg. This is the spectrum averaging menu. As seen
below, you can select between no spectrum averaging, 0.2,
0.5, 1.5 and 4.0 seconds of exponential averages. If the
signal is stable, the signal to noise ratio of the display
is improved by applying averaging as shown on the right in
the figures below. This would help if you are using the
spectrum to estimate signal to noise ratios and for
calibration of filters.
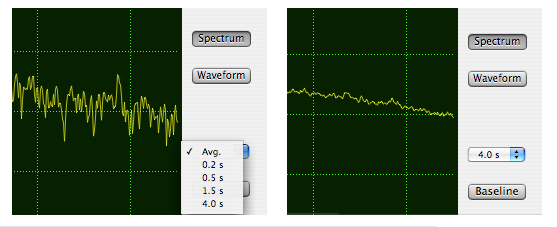
Notice that when spectrum
averaging is selected, the Baseline button below
it is enabled. This button allows you to choose to plot the
spectrum where the noise floor is held at a moderately
constant level in the plot. It allows you to compare the
signal to noise ratio between two antennas that have
different noise floors, for example.
When viewing a spectrum, DC is on the left of the plot and
the right side of the spectrum represents approximately
2750 Hz. Each horizontal grid line represents a 20 dB
change in power. A full-scale sine wave will peak at the
top grid line.
When viewing a waveform, the two yellow horizontal grid
lines show the peak full-scale signal.
We will discuss the proper input gain adjustment in the
Audio Input Level section. For now, just
select your particular device and make sure you can see
the waveform and spectrum changing with the input
signal.
Selecting the Output
Device
As with the Sources for the input device, an
output device can have a set of destinations (Internal
Speakers, Line Out, etc). The Dest popup menu is grayed out
if the selected device only has a single destination.
Audio Level
Adjustments
Since cocoaModem interfaces through audio signals with the
transceiver, it is very important that the audio level,
both from and to the transceiver be correctly set.
If the output levels are not set too low, you may not be
able to achieve the power levels you desire and if set too
high, you will be splattering and ruining
the band for everyone else.
If the input level is set too high, strong signals in the
passband may cause interference to the signal you are
trying to copy. And if the levels are set too low, you may
not be able to copy the really weak signals.
Each interface (RTTY, Dual RTTY, PSK, etc) in cocoaModem
has its own audio level adjustments. However, they mostly
share a common appearance which we will mention here, and
go into more detail if neccessary when the interfaces are
discussed.
Audio Input Level
For the input direction, cocoaModem provides an adjustable
attenuator together with a signal level meter in the form
of small green, yellow and red bars. They can be located at
different parts of the window for each interface, but they
should be readily visible. In the RTTY interface, for
example, it appears as below:
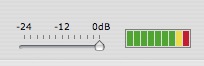
The red segment of the meter is
lit when the input signal is saturating the audio device,
or is within 0.5 dB of saturation. The yellow segment is
lit when the signal is within 1 dB of saturation. The rest
of the green bars are calibrated in 3 dB steps.
The red segment should never be lit, otherwise a strong
stations will splatter over the weaker stations nearly. If
the yellow segment lights up occasionally, chances are that
the audio device is probably still clipping for short
durations. Your audio chain should be adjusted so that you
are always operating in the green zone.
Each green segment represents half a bit of A/D converter
resolution, so it is best to keep as many of them lit as
possible. The AGC function of your transceiver will handle
some of the fading, but not after the signal fades to the
low end of the S-meter readings. This is what the
attenuator you see in the above image is for. The slider
allows you to attenuate the input signal and is calibrated
in decibel steps.
Be aware that not all audio devices will have 24 dB worth
of range that can be adjusted through software. In most
cases, cocoaModem can tell what the audio device’s
attenuation range is and the slider will “snap”
back to the maximum attenuation available if you exceed
this maximum.
To give yourself the maximum latitude of adjustment, you
should tune in a very loud signal (well above S9 on your
transceiver’s S Meter), then set the cocoaModem
attenuator for maximum attenuation (slider to the left)
that is available for that device and then adjust the
analog level from your transceiver so that the yellow
indicator is barely flickering. If your transceiver does
not have a facility to adjust the audio output level, it is
well worth considering installing a potentiometer between
the transceiver and the audio device of your computer. If
you are using an interface such as the SignaLink SL1+
between the transceiver and your computer, those devices
often come with an internal potentiometer which you can
adjust.
If you have no means of adding a potentiometer to preset
the audio level, although less than ideal, you can instead
use the “pad” field in the Config panel that
can be seen in Figure 2.
When the analog level is properly adjusted, you should be
able to keep strong signals from saturating the audio
device by setting the slider to maximum attenuation, but
still have maximal slider action to compensate for the
weaker signals by reducing the attenuation.
Some audio devices (such as an old version of the iMic) do
not have a software controllable attenuator. For these
devices, the cocoaModem attenuation slider is grayed out
– you will need to use other means of adjusting the
input level, such as a potentiometer in between the radio
and the A/D converter.
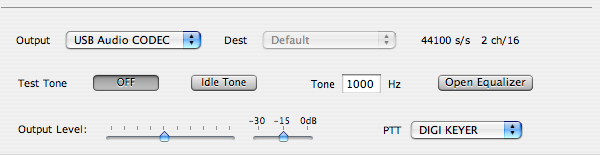
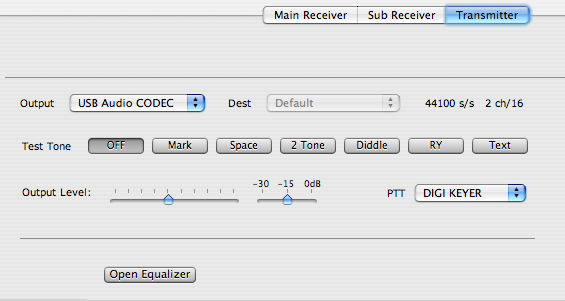
Audio Output Level and PTT
Selection
Each interface (RTTY, Dual RTTY, PSK, etc) in cocoaModem
also has its own output audio level adjustments. For the
most part, they share a common interface, but the test
signal buttons are different and these are documented later
in the individual sections for each interface.

There are two sliders for
adjusting the output level in cocoaModem. The larger one on
the left adjusts the value of the built-in attenuators in
the sound devices themselves. Very often, however, the
internal adjustment does not have sufficient range if there
is one at all. Because of this, there is a stepped
attenuator which controls the amplitude of the actual
numerical waveform that is generated by cocoaModem.
A 30 dB reduction of the amplitude of a waveform is a
reduction that is equivalent to about 5 bits at the D/A
converter's output. If the D/A converter has 16 bits of
resolution, a 30 dB attenuation of the amplitude will
provide a waveform that is at most 11 bits. This is
sufficient dynamic range even for PSK31, but a better idea
when you are faced with a situation where you have to apply
lots of attenuation, is to use an analog potentiometer to
attenuate the audio signal on the way to the transceiver.
By using high level audio signals up until the point where
it enters your radio, you will also be faced with fewer
noise and hum problems.
Each transmitting interface comes with a set of test
signals that you can use to make the output level
adjustments. The test signals will be discussed in the
mode-specific sections of this manual.
cocoaModem has a built-in time-out for these test signals.
This keeps you from accidentally leaving the transmitter on
while you are making adjustments to the audio levels. When
left unattended, cocoaModem will turn off a test signal if
it has been on for more than 3 minutes. If you need longer
than 3 minutes to adjust the audio levels, you will need to
press on a test tone button again.
Closure of the Config panel will also cause a test signal
to terminate.
When you quit the application, cocoaModem remembers the
changes you have made to the output level and attenuator
for each of your interfaces.
Each time you relaunch cocoaModem, it will set the output
level and attenuator setting to the positions you had left
it the time before. As long as you leave the transceiver
adjustments alone, you should not have to readjust
cocoaModem’s output level once it has been properly
set.
The main purpose of the audio output adjustments is to make
sure that you are operating within the linear region of an
SSB transmitter. Usually, that means that the audio levels
have to be reduced to the point where there is no ALC
activity in an SSB transmitter's power amplifier (PA).
Typically, the procedure is to increase the the audio drive
until you notice ALC kicking in, and then back off from
that position so there is again no ALC action. Your
transceiver manual should cover this under the AFSK,
Digital or Packet description.
Please note that the Elecraft K3 ALC indicator does not
directly indicate the ALC to the PA. With the K3, the first
4 to 5 bars indicate the audio level in the DSP stages of
the transmitter. The RF power amp's ALC begins to indicate
after the 5th bar. Hence, the K3 should be
operated with 4 bars showing.
Please be careful not to overdrive the transmitter. An
overdriven AFSK signal is overly broad, and possibly with
keyclicks that can interfere with stations that are many
kHz away. Keep an eye on the ALC of the transceiver as
often as practical. With some transceivers, the ALC setting
can even vary with changing antenna SWR.
With most transcievers, you can change the output power by
adjusting the audio drive from cocoaModem to the
transmitter. The Elecraft K3 is again different in this
aspect -- with the K3, you must use the RF PWR control to
control the output power, while maintaining 4 bars on the
ALC indicatior.
Check with the transmitter's specifications for how much
power the transmitter allows you to run. RTTY and MFSK
modes are 100% duty cycle modes. Many transmitters won't
allow you to run the maximum power at 100% duty cycle. Bear
in mind too that PSK31 has a crest factor of about 3 dB. This
means that you must never run 100 watts if the PA clips
at 100 watts -- to minimize the IMD, you must back the
average power to no more than 50 watts even if the
transmitter is rated at 100 watts at full duty cycle.
To the right of the output level controls is the popup menu
for selecting the PTT mechanism. Like the level controls,
each cocoaModem interface can have its own PTT selection.
Audio Equalizer
When using one of the wideband interfaces (PSK,
Hellschreiber and Wideband RTTY interfaces) cocoaModem
outputs a constant level audio tone, defined by the output
level slider.
Some transceivers (specifically the Yaesu FT-1000MP in AFSK
mode) have a transmit audio response that is not flat
across the audio spectrum. This causes the RF output power
to vary depending on which part of the waterfall you have
clicked as your transmit frequency.
cocoaModem 2.0 v0.29 adds an interface in the form of a
sheet that allows you to define an
audio passband that is not "flat." The equalizer sheet
is brought up by using the Open Equalizer
button, shown below for the PSK Config Panel:
The Open Equalizer
buttons for the Wideband RTTY and the Hellschreiber
interfaces are in the Transmit tab of their Config Panels :
When the Open
Equalizer button is clicked, the Equalizer Sheet drops
from the title bar of the Config Panel.

There is a column of text
fields to enter numbers that correspond to the relative
output power from the transmitter when it is modulated by a
constant level audio tone at the specified frequencies. The
PSK, Hellschreiber and Wideband RTTY interfaces have
independent tables that are save to your plist file.
Until you change them, all of these numbers are initialized
with 1.0, defining a flat audio response.
You can either use a well calibrated audio oscillator, or
use cocoaModem itself to create the test tones for
measuring the RF output from the transmitter.
The easiest way might be to use the "FM Hell 105" mode in
the Hellschreiber interface. The PSK interface is not
suitable since the envelope is not constant and some power
meters will not read the proper peak power. An RTTY signal
is too wide to give good readings for a response that is
uneven.
If you are using cocoaModem to measure the transmit audio
response of your transmitter, do the following:
- connect the transmitter through a good RF power meter
which in turn is connected to a dummy load,
- select the Hellschreiber interface, choose the FM
Hell 105 mode (Feld Hell is unsuitable since it is not
constant power, and FM Hell 245 is too wide),
- open the Equalizer sheet to make sure that a flat
response is selected (column of all 1.0s),
- in the receive section of the Hellschreiber Config
Panel, choose a frequency offset of 0 and select the USB
mode,
- click on the waterfall at 400 Hz, click on transmit
and record the RF power output from the transmitter. Use
a power that is sufficient to get good accuracy from the
power meter and make sure the dummy load specifications
are not exceeded
- repeat the power measurement for 600 Hz, 800 Hz, 1000
Hz, 1200 Hz, 1400 Hz, 1600 Hz, 1800 Hz, 2000 Hz, 2200 Hz
and 2400 Hz, making sure the ALC never comes on. If it
does, reduce the power and repeat all readings.
- Reopen the Equalizer sheet and enter these power
numbers into the "Power (measured)" column.
The plot on the right of the Equalizer sheet should show the computed equalizer curve (reciprocal of transmitted power).
Apply the same numbers to the PSK and Wideband RTTY Equalizer sheets if you use the same transmitter.
After applying the Equalizer, you can try sweeping the Hellschreiber waterfall again; you should notice a much flatter response. You can fine adjust the numbers, if you like. It should be relatively easy to flatten the response to 0.25 dB if the original response is flat to within 3 dB. cocoaModem limits the equalization to 3 dB worth of change.
Sound File Playback
Instead of taking audio input from an audio device in real time, cocoaModem’s demodulators can also accept input from an AIFF (.aiff extension) or WAV (.wav extension) sound file.
There are two buttons in the Config panel of each mode, one has the caption of Sound File, and the one next to it called Stop. When the Sound File button is pressed, you are presented with a file dialog to navigate to the sound file that you want to use. The sound file will loop until the Stop button is pressed.
The sound files should be recorded at 11025 samples/second and as a stereo file.
When Sound File playback is active, the usual audio input is bypassed.
The sound file can be made to play back at 4x real time speed if the Fast Sound File Playback checkbox is selected before the sound file is selected. This checkbox is usually found on the right of the Config panel.
Turning a Sound Device on or off
The input device is not “wired” to a modem until you change its state (button at the top left hand corner of the Input section) in its Config Panel from Inactive to Active. To turn off the modem, click on the button again to turn the button caption to Inactive.
If you want cocoaModem to automatically turn on a modem and reconnect the same device each time you relaunch cocoaModem, you will need to set the auto-connect preference.
NetAudio Devices
The input devices described above accept audio samples from real devices in MacOS’s Core Audio. Starting with v0.47, cocoaModem 2.0 includes a different source for audio streams that I am calling a NetAudio device. NetAudio uses the AUNetSend and AUNetReceive components in Core Audio.
Instead of going through the AUNetSend and AUNetReceive user interfaces, I have created a new NetAudio framework that allows the user to very simply set up links with audio devices on the local network or with a separate application on the same computer, if it is also using AUNetSend and AuNetReceive. NetAudio uses Zeroconf (also known as Bonjour and Rendezvous in MacOS X) to establish connection without the need of any predefined port number.
NetAudio allows various “front ends” to send audio streams to cocoaModem. Examples of “front-ends” includes applications such as software definable radios, HF channel simulators, sampling rate converters and even standalone modems working in remodulator mode. NetAudio also allows cocoaModem to transmit through software defined radios that accept AUNetSend packets.
Refer to the NetAudio Preferences section below on how to set cocoaModem to look for NetAudio devices. If they are defined, the NetAudio "devices" appear in the Input or Output Device menus in cocoaModem below a separator item from the real devices. cocoaModem assumes floating point samples, at 44100 samples/second and two channels from a client AUNetReceive, and likewise, will transmit audio streams with the same parameters.
Preferences
We will discuss general preferences in this section. Mode-specific configurations will be described under the configuration sections for the respective modes.
plist file
Each time you exit from cocoaModem 2.0, the preferences that you have chosen are saved into a property list (plist) file in your home directory’s Library/Preferences folder. The file is called w7ay.cocoaModem 2.0.plist and can be opened using the Property List Editor (a utility that is available on the Developer disk that comes with the MacOS X set) or with any standard text editor. While it is possible, I recommend that you don’t manually modify the contents of this file, unless you are familiar with what each plist item does.
You can safely remove the plist file at any time. cocoaModem will generate a default setting the next time you run the application.
Each user with an account on the Macintosh computer has his or her own cocoaModem 2.0 plist file.
User Preferences
The cocoaModem Preference panel is accessed by selecting the Preferences... item from the cocoaModem 2.0 menu in the Menu bar (the cocoaModem Menu is right next to the Apple logo on the left side of the main menu). You can also open the preference panel using the keyboard shortcut command-comma (holding down the command key and pressing the comma key).
There is a row of tabs at the top of the Preferences panel to select the preference class.
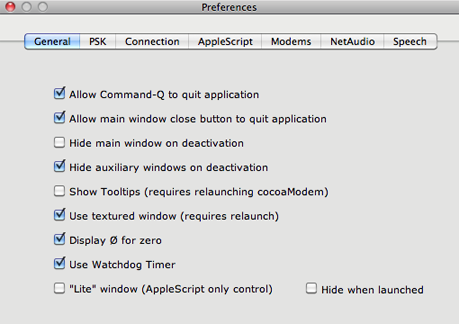
The first checkbox in the
General preferences selects whether the Command-Q keyboard
shortcut is active. Like other applications, the
Command-Q shortcut is one of the ways to quit
cocoaModem. You may wish to disable it in cocoaModem
so that you won’t inadvertently quit cocoaModem by
typing the wrong key in the middle of a QSO.
The next checkbox selects whether the standard close button
is active. This is the red button that is the
leftmost (red) button at the top left hand corner of MacOS
X windows. Again, disabling the close button will
prevent you from quitting cocoaModem in the middle of a QSO
by mistake.
The only quit mechanism that is never disabled is the
Quit cocoaModem selection in the cocoaModem Menu.
With the next two checkboxes, you can choose to hide the
main or any auxiliary windows (RTTY monitor panel, etc)
from the desktop when cocoaModem is not the active
application. This can reduce the clutter on your
desktop if you don’t need to cut and paste texts
between cocoaModem and other applications.
There are some some very simple tooltips (the text help
boxes that pops up when your cursor hovers over a button)
in cocoaModem for the novices. After a few minutes
with cocoaModem, you will probably find these more annoying
than helpful. The Show Tooltips checkbox
lets you choose to display the tooltips. This
checkbox will not activate or deactivate tooltips until you
have re-launched cocoaModem.
There are two different “skins” you can choose
to use for cocoaModem’s main window – one has
the gray appearance (like the windows in Mail and iTunes)
and the other has the appearance of a standard window (like
the ones in Sherlock). This checkbox also requires a
re-launch of cocoaModem before it takes effect.
With certain fonts, it is sometimes difficult to
distinguish an upper cased O from a zero. The
Display Ø for zero checkbox instructs cocoaModem
to substitute a zero by one that has a slash across it for
text that are sent or received through the radio. The
substituted character is not strictly a zero, but is the
character at Unicode 00D8 (option-shift-o on a Macintosh
keyboard). If you have this option turned on, please
be aware of this when you cut and paste from cocoaModem to
other applications.
The next checkbox is used to disable the watchdog timer.
Finally, the "Lite" checkbox lets you choose to use the
cocoaModem "Lite"
interface.
Connection
Preferences
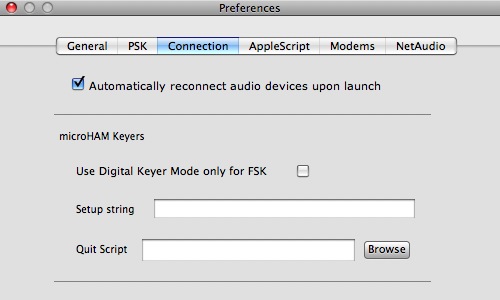
Figure 6a -
Connection Preferences
As seen in Figure 6a above, the
Connection tab in the Preference panel contains the
preferences for devices.
The Automatically reconnect...
checkbox controls if each audio device is automatically
made active when cocoaModem is launched if it had been
active when you last quit cocoaModem.
If your shack is set up so that the audio device is
permanently connected to the radio and is dedicated to
cocoaModem, this option allows you to launch cocoaModem and
start operating right away without the need to go into the
mode configuration to select and activate the device each
time.
If you had physically disconnected the device that was
previously in use and the auto connect preference is set,
cocoaModem will warn you about the missing device when you
restart the application.
The checkbox to Use Digital Keyer Mode only for
FSK allows you to choose if cocoaModem should switch
the keyer into digital mode for both PTT and FSK operation,
or to set it to digital mode only when you use FSK. If the
keyer is set to always use PTT2 as the PTT routing, you
will not need to switch the keyer to digital mode just to
use PTT.
The "Setup string" allows you to send a configuration
string to the microHAM keyer. Sending a string is not
recommended; you should configure the keyer from the µH
Router whenever possible.
If the user is using a microHAM keyer, cocoaModem sends a
QuitIfNotInUse AppleScript command to the µH
Router when cocoaModem is terminating. This default script
can be bypassed if the user specifies the path name of an
AppleScript file in the Quit Script field shown in
Figure 6 above. This script file can send AppleScript
commands to the µH Router to reconfigure the keyer, for
example to switch the keyer back to voice mode.
NetAudio Preferences
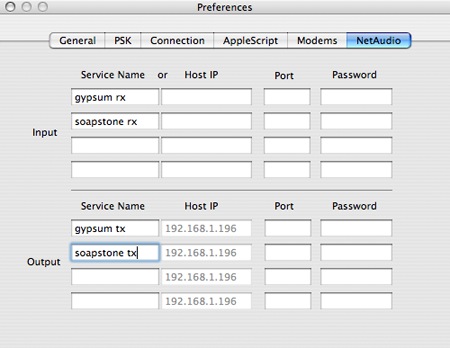
Figure 6b -
NetAudio Preferences
The NetAudio Preferences allow
you to set up NetAudio devices for cocoaModem to search
for.
NetAudio devices are separate applications (such as a
SoftRock-40 front end) that are written to feed cocoaModem
with audio streams as if they are real audio devices. The
output NetAudio devices allow cocoaModem to send audio
streams to these other applications.
For input, NetAudio uses Bonjour to discover AUNetSend
services and only the Bonjour Service Name is required for
it to work even if the interoperable application is on a
different machine in the local network. However, you can
set cocoaModem up to look for the service named
"AUNetSend" from specific computers on the local network
by specifying its IP address. The Port field is optional
and specifies to cocoaModem the specific port t connect
to. The Password field is also optional and is only
needed if the other application requires it.
For output, the Service Name is the Bonjour name that
cocoaModem will be transmitting to. The Host IP field is
the local machine's IP address. The Port field is optional
and specifies the port number to use. If that port number
is already in use, Mac OS X will try the next higher port
number. Mac OS X defaults to starting AUNetSend ports at
port 52800. The Password field is optional. If specified,
the receiving device will have to specify the same password
to connect.
NOTE: cocoaModem looks for
both real and NetAudio devices only at the time cocoaModem
is launched. cocoaModem has to be
relaunched when the NetAudio
Preferences is changed.
Speech Preferences
Please refer to the cocoaModem Incremental Speak
Interface for the speech Preferences.
Removing Modems
You can remove modems that you don’t commonly use
from cocoaModem’s main window. This should free up
some memory usage and also reduce the clutter in the
interface selection tab.
To remove the modems, deselect the checkboxes in the
Modems tab of the Preferences panel.
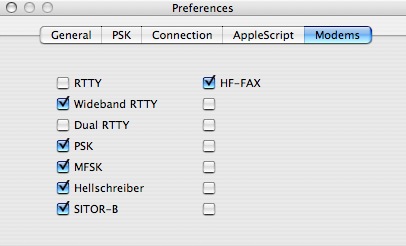
Figure
7
This procedure requires a relaunch of cocoaModem to take
effect.
(Some modems that appear in the preference panel are not
yet implemented and selecting those will not do anything.)
Selecting cocoaModem
Interfaces
When you launch cocoaModem 2.0, you will see the main
window shown in Figure 8.
A series of tabs at the top of the window selects the
interface to use. Figure 8 shows the RTTY interface
with the window appearance preference set to brushed metal.

Figure 8 -
Brushed Metal Main Window
Figure 9 shows the main window
with the standard appearance, instead of the
brushed-metal. Read the Preferences section on how to switch
between these two appearances. Figure 9 shows the main
window tabbed to the PSK interface.
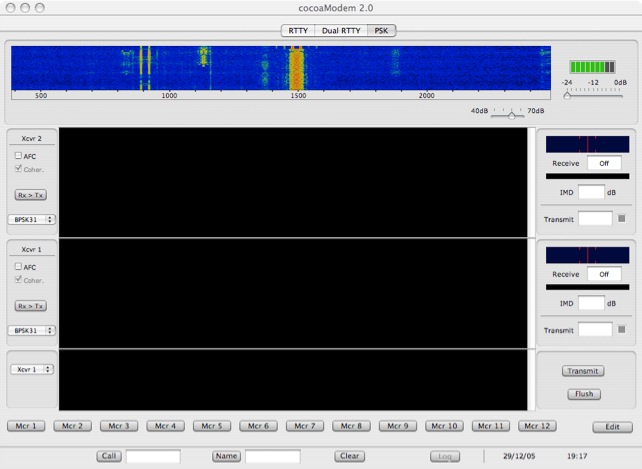
Figure 9 -
Non-brushed Metal Main Window
Macros
(please follow this link for the section on
macros)
Information Panels
There are some utility panels that can be opened under the
Window menu in the Menu Bar.
User Info Sheet
The User Info dialog sheet (Figure 12 below) is brought up
by selecting User Info in the Window Menu in the
Menu Bar. The User Info sheet contains the operator and
station info.
The information here is stored in unencrypted form in
your cocoaModem Preference file. Be sure you don’t
put anything in here that you won’t want anyone else
to read on your computer.
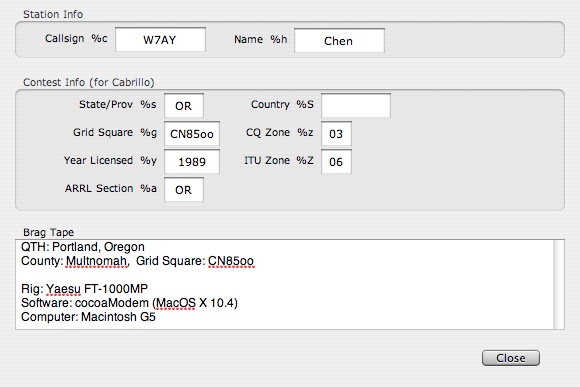
Figure 12 -
User, Contest Info and Brag Tape
The call sign and name fields
are the call sign and name that you wish to use on the air.
These two fields can be fetched using the %c and %h
(“handle”) macros, respectively. Note that your
call sign uses a lower case c as the macro. The upper case
C macro is reserved as the macro for the call sign for the
station that you are working (refer to the QSO Info section below).
Press on the close button when you are done editing the
sheet.
Contest and Cabrillo
Info
The fields in the Contest Info section of Figure 12 are
some of the common exchanges used in contests, although
some of the fields (e.g. Grid Square) can also be useful as
macros during a normal QSO. Information that changes from
contest to contest is stored in the Contest Info Sheet. Make sure you
have both filled properly if your are operating in a
contest.
The state/province (macro %s) field is the two character
(and three for some Canadian territories) abbreviation used
in contests (CA, OR, YT, QC, etc). If you are outside
USA/Canada, either leave this field empty (completely
empty, not even spaces) or enter DX in the field. If you
don’t do this, the Cabrillo file for certain ARRL
contests cannot be accurately created.
Certain ARRL contests also require the ARRL Section field
to accurately reflect the contester’s section (SCV
for Santa Clara Valley, AZ for Arizona, etc). Please make
sure this field is correctly entered so your entry will be
scored for the section in which you’d operated.
Contesters outside USA/Canada should leave this field
empty.
Brag Tape
Instead of having to repeatedly describe their station set
up, RTTY operators used to make up canned messages in the
form of punched “5-level” paper tape that the
tape readers on teletypewriters can read and transmit.
These became known as Brag Tapes.
cocoaModem stores the “Brag Tape” message in
the User Info panel. See Figure 12 above for an example of
the “Brag tape.” Although cocoaModem does not
currently restrict the size of the brag tape, please be
mindful that RTTY and PSK31 transmission rates are very
slow. Note also that there is a watch dog timer mechanism in cocoaModem
that keeps you from sending long texts unattended.
QSO Info
You may have noticed a small bar at the very bottom of the
RTTY and PSK tab views in Figures 8 and 9.
This bar at the bottom of the tab views is where
information for the current QSO can be stored and retrieved
through macros. To display or hide the QSO Info bar, use
the Show QSO Info item in the QSO menu in the menu
bar. Whether the QSO Bar is hidden is reflected in your
preference file; the next time you launch cocoaModem, the
QSO Bar will show or not show depending on how you left it
when you last quit cocoaModem.
The Call field is where the call sign of someone
you are in QSO with can be stored. The Name field
is where the name of someone you are in QSO with can be
stored.
The fields in here can be retrieved through string macros.
%C (notice the uppercase C, the lowercased %c retrieves
your own call sign that is stored in the User Info sheet)
will retrieve the call sign field that is in the QSO bar,
and %H (notice the uppercase H, the lowercased %h retrieves
your own name from the User Info sheet) will retrieve the
name field.
There are also keyboard shortcuts that you can use instead
of the buttons. Once a word is selected in the receive text
view, it can be transferred to the call sign field by using
the keyboard shortcut command-shift-C (i.e., holding down
both the shift and command keys and striking the C key on
the keyboard). Similarly, the selected text can be
transferred to the name field using command-shift-N. These
commands are selectable in the QSO menu of the menu bar.
These two text field can also be accessed through AppleScripts.
The Log button does not directly perform a
function in cocoaModem. Instead, it causes an AppleScript
to be executed. The AppleScript file that this button
invokes can be found in the QSO tabview of the cocoaModem
Preferences panel. You can either type in
the full path of the AppleScript file, or use the Browse
button to set the file. An empty file name or a
malformed AppleScript will cause the Log button to be
disabled.
The information in the QSO Info strip are available to
AppleScript so the script file that is executed through the
Log button can fetch these fields (and other
information such as the current operating mode, RTTY tone
pair and the PSK offset frequency) and send them to a
logging program.
Entering Data into the QSO Info
Bar
In addition to manually typing into the call sign and name
fields of the QSO Info bar, you can select (hold down mouse
button and drag over a text selection) the call sign or
name or text in the receive text view, and then click on
the Call or Name button in the QSO bar to
transfer the selected text to the respective fields. As
usual, you can also double-click on a word in the receive
text view to select it as a call sign or name, which you
can then transfer to the QSO Info fields with their
buttons.
Text Attributes and Copying Texts in
Text Views
You can change the color, font and font size of the text in
each text view.
The config panels have color wells to choose the
color scheme
that is used for each interface mode. Click once on a color
well and the color picker for that well will appear. (Note:
if you double click on a color well, the color in the well
will not directly update from the color picker; remember to
click only once on any color well in any Cocoa application.
However, you can always drag a color from the color well in
the Color Picker into any other color well.)
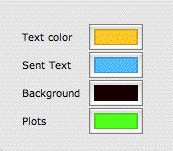
The color wells for receive and
sent views might appear separately in the Receive and
Transmit Config panels instead of beingall grouped together
as shown here.
The color in the Text color well is the color of the text
for both the receive (upper) and transmit text views in the
RTTY window. The Background color well is the background
color for both of the text views.
When text is inserted into the transmit text view of the
RTTY window, either from the keyboard or from macros, it
enters cocoaModem's transmit buffer and stays there until
every character is transmitted. If the RTTY modem is not in
the transmit state, the characters simply stay in the
buffer until the next time the transmit state becomes
active (or when the buffer is flushed). As each character
in the transmit buffer is being transmitted, it is echoed
to the receive text view. This echoed character can take on
a different color in the receive text view, defined by the
color in the “Sent text” color well on the
left.
The various cocoaModem interfaces, Config Panels and the
RTTY Monitor contain plots. Spectra in cocoaModem are
usually plotted in yellow and waveforms (including the
samples for the crossed ellipse tuning indicator) in
cocoaModem are plotted in green. The colors of the scales
in the plots are reverse, i.e., scales for the spectrum
plots are in green and scales of the waveform plots are in
yellow.
Wherever the color green appears in these plots, the color
can be substituted to some higher contrast color by
changing the color in the “Plots” color well.
They can, for example be changed to white for maximum
contrast against the background.
The font that is
used in a text view can be change by bringing up the MacOS
Font Picker. Click on some text in the text view (or click
inside the empty scroll view) then select the Show
Fonts item in the Font menu in the menu bar (or use
the Command-T keyboard shortcut). Select the family,
typeface and size of the font in the Font Panel.
If a font size that you need is not in the Font Panel, you
can click on the button with the gear icon at the bottom of
the panel and select Edit Sizes… to include
the size that you want.
The text in the text views are selectable and can be copied
into the clipboard (and transferred to another
application). The content of a receive view is otherwise
not editable, except for being able to erase the selected
portions. You can erase all the text in a view by using
Command-A to select the entire content of a view, and
hitting the Delete key on your keyboard.
Please be aware that if you had selected Display Ø for
zero in your preferences, the clipboard will contain
the slash zeros (not numerical zeros) where real zeros
appear. It is better to use the Log Applescript to handle the copying of
callsigns if you have the Display Ø for zero
preference selected.
Watchdog Timers
cocoaModem has built-in time-outs to prevent the
transmitter from being keyed for indefinite periods.
While transmitting, cocoaModem will automatically turn off
the transmitted audio and return to receive mode if there
has been no keyboard activity in more than one minute. The
timer can be disabled by unselecting the watchdog timer
checkbox in the user preference panel.
While transmitting test tones from the Config panels,
cocoaModem will automatically turn the test tone off after
three minutes.
AppleScript
The cocoaModem 2.0 AppleScript capabilities is described in
detail here.
Keyboard Shortcuts
Keyboard shortcuts on the MacOS are command keys that
represents some event. They are often used instead of
slower menu selection or button pushes.
The following are some of the keyboard shortcuts in
cocoaModem:
| command-comma | open Preference panel
|
|
| command-option-comma | open mode Config panel
|
|
| command-1 | invoke Macro #1, (command-2 invokes Macro 2, etc)
|
|
| command-Q | quit (see override in Preference Panel)
|
|
| command-R | switch to receive mode
|
|
| command-S | save contest session
|
|
| command-T | switch to transmit mode
|
|
| command-X | switch to receive mode after the transmit buffer is
empty
|
|
| command-T | switch to transmit mode
|
|
| command-X | switch to receive mode after the transmit buffer is
empty
|
|
| command-shift-C | transfer text selection to QSO call field
|
|
| command-shift-N | transfer text selection to QSO name field
|
|
| command-shift-T | select font for selected text view
|
Using Keyboard Shortcuts to control Transmit/Receive
In addition to the transmit/receive button in the modem windows, there are three menu items and keyboard shortcuts to control the transmit/receive state. The menu items are found in the T/R Menu in the Menu bar. See Figure 14 below.
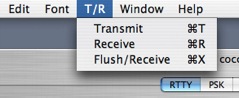
Figure 14 - Transmit/Receive Menu
The Transmit Menu item in
Figure 14 (or the keyboard shortcut Command-T) has the same
effect as pressing the Transmit button in the modem window.
The Receive Menu item (Command-R) has the same effect as
pressing the Receive button to return to receive mode. Note
that the latter command will also defer returning to
receive mode until the transmit buffer is empty.
Figure 14 shows a third T/R menu item called Flush/Receive,
associated with the Command-X keyboard shortcut. What
Flush/receive does is to flush whatever remains in the
modem’s transmit buffer that has not yet been
transmitted, and returns the modem immediately to receive
mode. It is equivalent to clicking on the Flush button in
the modem window and right away clicking on the Receive
button in the modem window.
Next (RTTY Interfaces)