
Transceiver Interfaces
Kok Chen,
W7AY [w7ay
(at) arrl.net]
Last updated: May 11, 2007
Interface Requirements
cocoaModem receives and transmits signals that are in the audio range. To connect the computer to a radio, you'll need to provide three interface components:
- Sound Input and Output
- Ground Loop and Noise isolation
- Transmit keying
The modes that are dedicated for digital use are sometimes called AFSK, Packet or Data modes by the various radio manufacturers. These modes automatically disable voice mode circuits in the transceiver (such as an audio processor) which could degrade digital mode signals. Instead of loudspeaker output levels and microphone input levels, these dedicated modes use signals with fixed audio levels that are more suitable for the line level of the Audio Interface that you use.
In addition to modulating the transceiver, cocoaModem also needs to be able to key the transceiver in and out of transmit mode.
To ensure that hum loops and noise are not present, you will also need to transformer-couple the audio signals between the computer and the transceiver. In addition, you must ensure that sounds from Mac OS X and other applications do not get transmitted over the air. Sounds that you must prevent from going on the air includes Mac OS system alerts, user interface sound effects, audio from a web page, iTunes, etc.
"Direct" Sound Interface
Although the following is not recommended for regular use, this "interface" illustrates the principles involved with digital interfaces.
Many Macintosh computers come with a built-in microphone and a loudspeaker. Almost all transceivers come with VOX and/or a manual transmit button (MOX). You can therefore operate digital modes without any additional physical interface -- simply use sound waves!
By placing the Macintosh's built-in microphone close enough to the transceiver's loudspeaker, you will be able to demodulate the digital signals from the transceiver.
Select the Built-in Microphone from the sound Input Menu in a cocoaModem Config panel. The sound need not be loud -- just make sure that the distance between the speaker and the microphone is short so that the direct sound from the speaker to the microphone is much louder than any sound reflections from walls and large objects in the room. Reflections from walls have a behavior similar to multipath propagation and a wall that is only two meters away can present a delay that amounts to more than half of a bit period for a 45 baud RTTY signal!
Similarly, you can transmit a digital signal by placing the transceiver's microphone against the computer's speakers, again making sure the transceiver's microphone does not pick up reflections and other noises in the room. Select Built-in Output from the Output Device Menu of the Transmit Configuration. With some Macintosh models you will need to select the internal speakers by choosing Built-in Audio from the Output Device Menu and then selecting Internal Speakers from the Destination Menu.
If you are operating using VOX, the transceiver will enter the transmit mode whenever cocoaModem transmits a tone. Otherwise, you can activate the manual PTT switch (MOX, PTT on a hand microphone or foot switch, etc) before switching cocoaModem over to transmit state and releasing the manual PTT after you have returned cocoaModem to a receive state.
When operated in this manner, you must ensure that the room is quiet of human voices, music or sounds from pets and children, since they are not allowed in the digital sub bands. Additionally, you have to turn off all system alert sounds, and you have to mute all sounds which can come from other applications.
Notice that one computer sends sound waves that is transmitted as RF from a radio to a second radio. The second radio turns the RF signal back into sound waves again. The received audio is then demodulated and decoded by a second computer.
If the two computers are within hearing range of one another, you would not need the two radios. You can simply send the sound output from the speakers of one computer to the microphone input of the second computer. Indeed, a direct computer-to-computer sound interface is a good way to demonstrate digital mode principles. The two radios simply allow the computers to be separated by large distances.
I have often been asked "what does Hellschreiber sound like on the airwaves?" You now have the obvious answer -- select the computer speaker as cocoaModem's output device, initiate transmit and start typing. The sounds that you hear on the computer's speakers are precisely the same sounds that you hear from a radio that is receiving the digital signal.
Sound Input and Output
Note that the "direct sound interface" satisfies the three requirements mentioned above by (1) using the built-in sound input and output of the computer. It generates no ground loop (2) since the computer is connected to the radio through sound waves, and (3) the transmitter is keyed either manually or by using VOX.
For serious operating, you would not use sound waves to connect your computer to the radio. You will be connecting electrically through proper sound devices. For a discussion of sound interfaces, see this section.
Ground Loop Isolation
When you connect a computer's sound device directly to the radio, you run the risk of creating a ground loop when the connecting cable ties the chassis of the computer directly to the chassis of the radio, with both chassis also grounded to the AC outlets. A ground loop can introduce hum and noise to the intended signals. On input, this can degrade demodulation, and on output, you can be transmitting unintended signals that interfere with other stations.
The easiest way to break a ground loop is to use transformer coupling between the computer's sound device and the radio. You will need one transformer for the input signal and a separate transformer for the output signal.
Transmit Keying
When transmitting a digital signal, you will need a way to switch your transceiver into transmit mode.
As explained earlier. you can use a manual button (manual transmit button on the transceiver, a microphone PTT switch or a foot switch, for example). But it is much more convenient to automatically switch between receive and transmit modes.
This section discusses Push-toTalk (PTT) devices in greater detail.
Common PTT Interfaces used by cocoaModem Users
The following table shows some interfaces that works with cocoaModem.
For each device, the PTT column shows if the device is capable of driving the PTT input of the transceiver (those that are capable have a black dot). When the PTT entry says "vox," it means that there is limited functionality, since it will typically not work with cocoaModem's CW interface, for example.
The Transformer column shows if the device comes with built in transformers to provide ground loop isolation. You will need to provide your own transformers if the device does not come with them. The devices marked 1 have one input and one output transformer. Devices marked 2 have two input transformers and one output transformer. If you have a transceiver that has two receiver outputs (such as the Yaesu FT-1000 or the Ten-Tec Orion) you would need to provide an extra transformer with the devices that are marked 1.
The Sound Device column indicates if the device comes with its own sound interface ("sound card"). A 1 in that column shows that the device comes with one input and one output audio channel, and a 2 in that column shows that the device comes with two input audio channel and one output audio channel. For sound cards that have two input channels, you can choose either one in the receive configuration panels in cocoaModem.
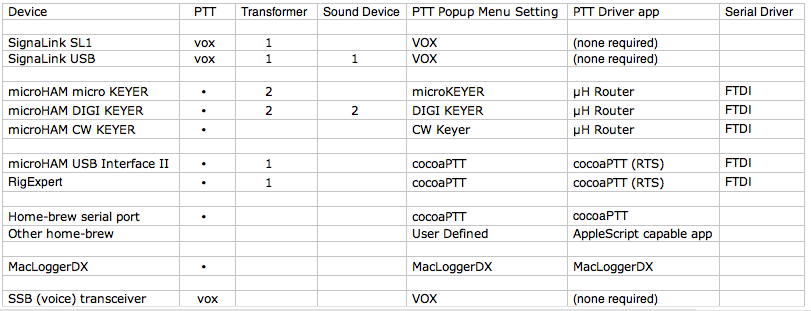
The PTT Popup Menu
Setting shows which menu item to select in the PTT
popup menu in cocoaModem's transmit configuration. The
PTT Driver app column indicates the app that you
should be running to support the popup menu item.
The Serial Driver column is the serial driver
(from the manufacturer) that has to be installed before the
devices can be seen in MacOS X. Notice that if you are
using a serial port with a home brew serial port or if
MacLoggerDX uses a serial port, you will have to also load
the respective serial drivers for them -- typically a FTDI,
Prolific, Silicon Labs, or KeySpan driver.