2. Creating an NC Program for a Simple Dipole
Enter the following text into NC Source of the window that you have named "dipole."
You can copy and paste the following text directly from the web browser. Although the tab columns will not come out correctly from the browser, it will not matter since NC does not really care about the column positions of the text.
model ( "dipole" )
{
real height, length ;
height = 40' ;
length = 5.0 ;
wire( 0, -length, height, 0, length, height, #14, 21 ) ;
}
Each model is enclosed in a special function named model.
An NC function's name is followed by an argument list that is enclosed by parentheses. In the case of the model function, the function argument is a single string within double quotes. The string is an arbitrary name that you can give to your model and it will be included in a NEC-2 comment card.
As seen above, the function body which follows the argument list is enclosed within braces ("curly brackets").
In NC, carriage returns are treated as if they are spaces or tabs. Extra spaces, tabs and carriage returns are ignored by NC.
A function body starts with variable declarations, if there are any, and followed by statements. Declarations and statements terminate with a semicolon.
In the above example, we have declared two real (floating point) variables, one is called "height," and the other is called "length." You can use the keyword float interchangeably with the keyword real (real is more familiar to FORTRAN users and float is more familiar to C programmers). You can declare integer variables by using the keyword int.
The variable "height" is then assigned the value of 40 feet, and the variable "length" is assigned the value of 5.0 meters.
Dimensions that are used in NC are expressed in meters. However, you can define numerical constants in feet by using a single quote immediately after a number without intervening spaces (e.g., 35.6' for 35.6 feet) and you can define numerical constants in inches by using a double quote right after a number (e.g., 6" for 6 inches). NC will convert these numbers into meters before sending them to NEC-2.
You can also define a numerical constant that represents the radius of an American Wire Gauge (AWG) wire by placing a # right before a wire gauge. In the above example, the #14 is equivalent to using 0.000814 meters.
The last statement in the above example defines a function that creates a wire. The first three arguments of the function wire are the coordinates (x, y and z) of one end of the wire and the next three arguments of wire are the coordinates of the second end of the wire. The next to last argument is the radius of the wire followed finally by an integer that defines the number of NEC2 segments the wire has.
Notice that we could have declared the same wire as the above by using a statement
wire( 0, -5, 40', 0, 5, 40', #14, 21 ) ;
However, if you need to change the height of the antenna, you would have to edit two separate values in the function, whereas by using variables, you would need only to change it at one place. There is also less likelihood for making data entry errors.
If the last argument of the wire function is an even number, cocoaNEC will change it into an odd number. This will ensure that when the wire is fed, it will be fed in the exact center of the wire. If you need to explicitly define the number of segments as either an odd or an even number, use the line function instead:
line( 0, -5, 40', 0, 5, 40', #14, 22 ) ;
At this point, we have created a model for an antenna that has a single 14 gauge wire which is 40 feet high, and extending 5 meters in the +y direction and 5 meters in the -y direction.
However we have not yet added any excitation.
Excitation
To add an excitation to the center of the wire, we first create a variable that is declared as an element type. We then assign the wire to that variable. We then use either the voltageFeed function or the currentFeed function to feed a voltage or current to the wire, viz.
model ( "dipole" )
{
real height, length ;
element driven ;
height = 40' ;
length = 5.0 ;
driven = wire( 0, -length, height, 0, length, height, #14, 21 ) ;
voltageFeed( driven, 1.0, 0.0 ) ;
}
The second argument to the voltageFeed function is the real part of the voltage and the third argument is the imaginary part of the voltage.
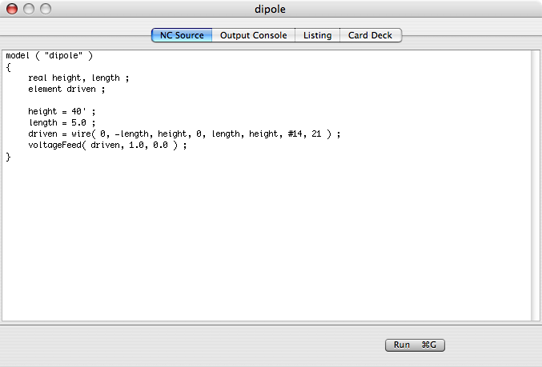
The NC Source text view should now look like the following after making the excitation changes:
Click on Run, and after a short delay, the output window should appear with the following:
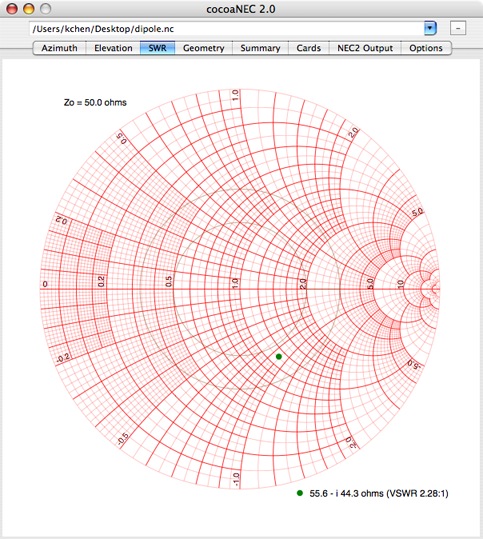
You can now click on the different tab views in the output window to look at other outputs from your antenna model.
For more details on the Output Window, how to superimpose plots from reference antennas and how to print the views in it, please go to the Spreadsheet tutorial and the Reference Manual. The Output Window is common to both the Spreadsheet models and the NC models.
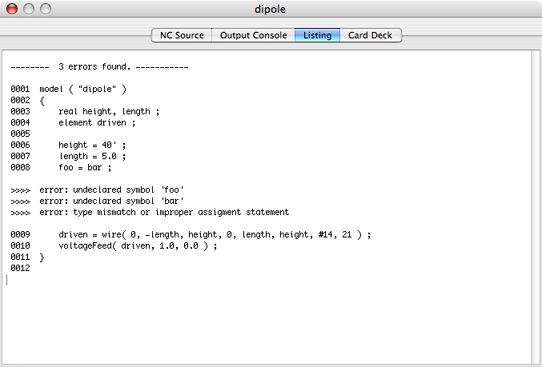
Errors
If NC detects an error while parsing the source code, the NC window will switch over to the Listing panel when you hit the Run button. The screenshot below shows the typical error messages that you will see when you mistype the name of a function or variable.