MFSK16 Interface
The MFSK16 shares the MFSK interface with DominoEX.
The MFSK16 mode is a standard which uses 16 tones. MFSK16 is a 100% duty cycle mode, and at all times one and only one tone is present. The shortest duration of a tone is 64 milliseconds long -- equivalent to a channel baud rate of 15.625 symbols/second. The tones are separated by 15.625 Hz from one another, with the lowest and highest tones separated by 234 Hz. Including the keying sidebands, an MFSK16 signal is nominally 316 Hz wide.
Each of the 16 possible tones of MFSK16 represents four bits of data. The raw data on the channel is therefore transmitted at 62.5 bits/second. This data is passed through a forward error correction (FEC) logic which reduces the information rate by a factor of two, thus causing the actual throughput of MFSK16 to be 2 bits per 64 milliseconds, or a rate of 31.25 bits/second (the same as PSK31).
The FEC logic consists of a data interleaver and a rate-1/2 convolutional code. The interleaver spreads the data bits over a range of 124 data slots so that any burst error that is caused by fading or interference will not all be concentrated within the constraint length of the convolutional code. The interleaver adds a latency of a little under one second to the data stream but adds tremendously to the robustness of MFSK16.
For cocoaModem's MFSK implementation details, see here.
MFSK16 Operation
Please familiarize yourself with the general cocoaModem interface and configuration panels before proceeding with this section.
To use MFSK16, first select the MFSK tab at the top of the main cocoaModem window. The Mode Menu is then used to select between MFSK16 and the DominoEX modes.
Fig 1 shows the cocoaModem MFSK16 interface.
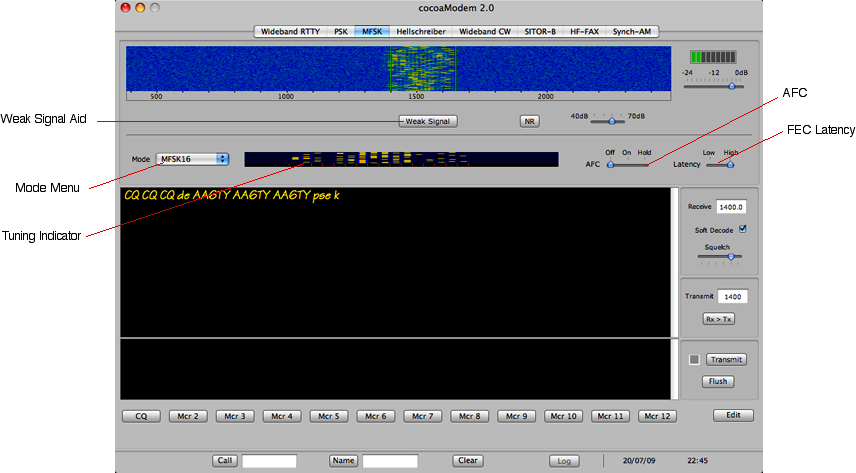
The top part of the interface consists of the familiar
waterfall display, together with the MFSK tuning indicator.
Below that are the receiver section, the transmitter
section and the usual macros and QSO information fields.
Tuning an MFSK signal
The waterfall display in Figure 1 shows a spectograph of a
typical MFSK16 signal.
MFSK16 usually requires you to select Upper sideband mode
on your transceiver. cocoaModem however, automatically
rearranges the tones in the MFSK16 decoder and encoder so
that you can choose to operate with either upper sideband
or lower sideband.
You have to make sure that the Dial Readout
parameters (Figure 2) in the Receiver Config panel agrees
with what your transceiver is using. Failure to do this
will cause no reception, and your transmission will also
not be decoded by anyone else.
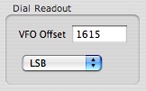
Figure 2 -
Sideband configuration
Even if you are using USB
transmission, it is well worth entering the AFSK VFO offset
of your transceiver into the VFO field, since the readings
under the waterfall can be used to directly determine your
transmission passband. If you are using voice mode SSB for
transmission, the VFO Offset should be set to zero.
Figure 3 shows in detail waterfall display when the
Dial Readout parameters are set to the ones shown
above in Figure 2 (one of the Yaesu FT-1000MP's AFSK
settings).
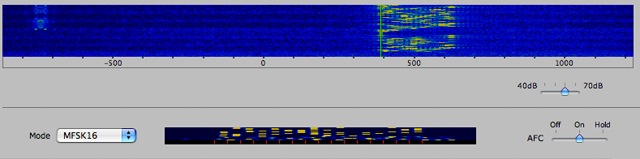
As with the other wide band
interfaces in cocoaModem, when LSB is chosen, signals with
lower audio tones will appear on the right side of the
waterfall and signals with higher audio tones will appear
towards the left side of the waterfall.
When the Dial Readout parameters are correctly set, the
label that is below the waterfall indicates the frequency
(in Hz) that can be applied to your transceiver's VFO dial
to get the precise frequencies you are transmitting at.
Notice that in the above example, the zero frequency offset
is actually near the middle of the waterfall, rather than
on the left or right side -- this is typical when the VFO
offset is non-zero.
The slider that is below the waterfall display allows you
to choose the dynamic range of the waterfall.
You can identify a clean MFSK16 signal from the fact that
the signal is about 250 Hz wide on the waterfall and you
can sometimes see the 16 separate tones. Whether you have
selected to use USB or LSB in the VFO Readout
parameters, you "tune" an MFSK16 signal in cocoaModem by
clicking on the leftmost tone on
the waterfall, or as close to it as you can.
When an MFSK16 transmission begins, it will idle for a
short time on this lowest tone -- that should also provide
you with a location in the waterfall to click on.
Below the waterfall display section are the MFSK mode
selector (you can only select MFSK16 for now) and some
tuning aids.
Once you click on the waterfall, you should see a set of
yellow columns appear in the tuning indicator. Figure 4
shows what the indicator looks like when receiving and
locked to a very clean signal. Initially, the red tick
marks may not be centered in between the yellow columns.
Once cocoaModem manages to make a guess of which is a base
tone, the red tick marks in the tuning indicator will move
and position themselves in between the yellow columns, as
shown in Figure 4.
Soon after, decoded characters
should appear in the receive text view.
If you had clicked on a DominoEX 16 or DominoEX 8 signal
instead of an MFSK16 signal, you will see two additional
tones (18 altogether) instead of the 16 tones above.
The "print" will not appear right after you click on the
waterfall. Be patient. The demodulated signal has to go
through the interleaver which adds a latency of about 1
second. The signal then proceeds to the decoder for the
convolutional code, which adds a additional latency of
about 1.5 seconds.
The cocoaModem click buffer is present in the MFSK
interface -- this mean that if you click on a signal that
is already showing in the waterfall for more than 2.5
seconds, the "print" will appear as soon as a third of a
second (depending on the speed of your computer).
To further reduce the latency, there is a slider (Figure 5)
in the cocoaModem MFSK interface to the right of the AFC
slider that allows you to select a lower latency at the
expense of fewer errors being corrected in the FEC logic.
For almost all but the weakest signal in MFSK16, you should
not notice much loss by selecting lower latency, and it
will allow you to print a signal with a little over a
second less latency.

The automatic tuning described
above happens when the AFC slider (to the right of the
tuning indicator) is set to On. If slider is set
to Off, the red tick marks in the tuning indicator
will not move and it is up to you to manually fine tune the
signal so that the yellow columns line up in between the
red tick marks.
Bear in mind that the red tick marks are just 15.625 Hz
from one another. You will need to very slowly tune the VFO
of your transceiver. Alternately, you can use cocoaModem's
fine tuning mechanism to tune. If cocoaModem's window is
active and with your mouse cursor positioned inside the
waterfall display, the mouse scroll wheel acts as an the
fine tuning mechanism.
Click on the title bar of cocoaModem's window to activate
the window. When you fine tune, not click on the mouse
since that will cause a different frequency to be selected.
Instead, simply move the mouse so the cursor is within the
waterfall.
If your mouse does not come with a scroll wheel, you can
still fine tune using the arrow keys on your
keyboard while the Command key on the keyboard is
depressed. The left and right arrow keys provide tuning
steps of about 0.5 Hz and the up and down arrow keys
provide a coarser tuning step.
Once the yellow columns are locked in between the red tick
marks when AFC is On, you can choose to move the
slider to the Hold position. This is useful when
you are receiving a station that has a stable signal which
does not drift with time. cocoaModem's interface will keep
the receiver tuned to the right spot even when the signal
is no longer transmitting. This way, when the signal
resumes transmission, you will already have locked in and
can print the signal as soon as possible.
For very weak signals, you can turn on the Weak Signal
button below the waterfall. The display will turn into
something like what is shown below:

Receiver Section
As shown in Figure 1 above, the MFSK interface's
receiver section is below the tuning section. Figure 6
below shows in greater detail the MFSK controls that are
on the right of the receive text view.

Figure 6 - MFSK Controls
Shown in Figure 6 are two text
fields which show the tone offsets for the MFSK receiver
and the transmitter.
When you click on the waterfall, the audio frequency that
corresponds to the location that is clicked is transferred
to both the receive and transmit frequency fields. If the
AFC is turned on and there is a signal, the receive
frequency will lock to and track the MFSK signal's
frequency. The receive field will also track any fine
tuning that is performed with the mouse scroll wheel or the
arrow keys.
However, the transmit frequency will remain tuned to the
frequency that you have clicked on.
If you want the current receive frequency to become the
transmit frequency, click on the Rx > Tx
button.
If you are the station who is initiating a contact (e.g.,
by calling CQ), click on the waterfall to set a location to
transmit. If a station answers, either allow the AFC to
automatically lock to the station or use the mouse scroll
wheel to tune the station in. Do not touch the Rx >
Tx button since the other station has already
established the original click location as your transmit
frequency.
If you are answering some other station's CQ, click on
signal and wait for lock to occur. When the receiver is
locked and printing, immediately click on the Rx >
Tx button so that your transmit frequency is set to be
the same as his transmit frequency.
The receive box also has a Soft Decode check box
and a Squelch control.
cocoaModem implements both a soft decision decoder and a
hard decision decoder for MFSK. The soft decoder (default
state) uses more processor cycles but is also capable of
printing a signal that is approximately 1 dB noisier than
the hard decision decoder.
The squelch control keys on the signal-to-noise ratio of
the received signal, rather than its signal strength. When
the squelch is set all the way to the right, cocoaModem
will print every symbol, whether they are reliable or not.
When the Squelch slider is push all the way to the left,
only good signal-to-noise cases allow printing.
Transmitter Section
The MFSK transmit section behaves similarly to the other
interfaces. Once a frequency is selected in the waterfall,
clicking on the Transmit button will cause the
indicator button to turn red, the PTT will activate and the
interface starts transmitting. The Transmit button's
caption also turns into Receive.
When Receive is clicked, cocoaModem will wait
until all buffered characters have cleared the encoder
pipeline. While the buffer is clearing, the transmit
indicator light will turn yellow. When all characters have
cleared the encoder, the PTT will deactivate, the transmit
indicator will extinguish, the button caption again turns
to Transmit, and the MFSK receiver will again be
active.
Characters that have not yet entered the encoder can be
removed from the buffer by clicking on the Flush
button.
As with other interfaces in cocoaModem, you can enter the
transmit state by using the Command-T keyboard
shortcut. You can return to the receive state with the
Command-R keyboard shortcut. And you can flush the
buffer and return to the receive state by using the
Command-X keyboard shortcut.
MFSK is a 100% duty cycle mode and will therefore work fine
under VOX control.