Lesson 1
Although we will mention the Arduino Micro in this tutorial, it applies also to the Arduino Leonardo.
The rest of this page describes how to set up AVR Tools to upload a previously compiled hex program file to the Arduino Micro.
1. Checking the Serial Port
There is no real need to identify the Arduino Micro's serial port if you follow the instructions which follow to upload a hex file. However, if this is the first time that you are using the Arduino Micro on the Macintosh, the steps here will check to make sure the Arduino Micro can be seen by the computer.
With the Arduino Micro unattached to the computer, launch AVR Tools.
An AVR Tools session window should appear. Select Show Serial Ports from the Window menu.
Note that you can create a new session window at any time by using the New Sessions menu item in the AVR Tools' File menu.
The Arduino implements the serial USB CDC Class, which requires no Mac OS X driver installation, and the Arduino should mount itself as a modem port on your computer. When it does so, you may see a Mac OS X alert that looks like this:
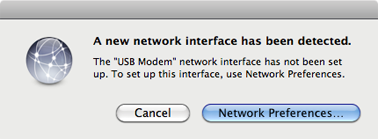
You can just click the
Cancel button if the alert appears.
The Serial Ports window in AVR Tools should show that a
port has been added:
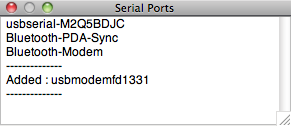
If you see this, the Macintosh
has recognized the Arduino Micro. The name should be in the
form of "usbmodem" followed by a hex number that indicates
where the Arduino is plugged into your USB Device Tree.
Note: you can stop Mac OS X from issuing the alert above in the future each time you plug the Arduino into this particular USB port by clicking the Network Preferences... button.
Mac OS X will launch System Preferences. Give the Configuration in the Network Preference Panel any name (for example "Arduino") while leaving all the other parameters of the interface empty.
Do not click the connect button in the Network Preferences, or Mac OS X will try to use the Arduino as a modem!
You may also see a "Removed" message in the Serial Ports window about eight seconds after the "Added" message appears.
The serial port appears when the Arduino Micro is running the Bootloader. The Bootloader only runs for 8 seconds after power is first applied to the Arduino Micro, or after its Reset button is pushed and released. After the 8 seconds, the Arduino Micro branches off to run the user code that was uploaded to the flash memory. If the program that is running in the Arduino Micro does not open the Serial Port, the serial port will not reappear on the USB connector.
The green LED near the USB connector on the Arduino Micro pulses slowly while the Bootloader is running.
You can now close the Serial Ports window after confirming that the Mac can see the Arduino Micro.
2. Setting up the Programmer
Select the Programmer tab in the AVR Tools window and set the programmer Type menu to Arduino Micro (or Arduino Leonardo -- either selection will work). Be sure to select "(Dynamic)" as the Serial Port. Do not use the port that was found in the previous section since the port is not available permanently.

3. Setting up the AVR Device
Select the Device tab to choose the AVR
device. The Arduino Micro uses an ATmega32U4:

4. Setting up the Example Firmware
Download the AVR Tools Tutorial disk image. Double
click on the disk image icon to expand the disk image
into a disk volume, and drag-copy the Arduino
Micro folder from it to the computer's desktop.
The firmware.hex file in that folder contains the hex
code which was built to run on the ATmega32U in an
Arduino Micro.
You can now eject the disk image, and trash the downloaded
dmg file.
Select the Program tab in the AVR Tools window.
Use the browse button to the right of the text field named
Flash to select the firmware.hex file in the
Arduino Micro folder that you have copied to your desktop.
At this point, you can select Save in the File
Menu to save your session settings (programmer, AVR device
type and hex file location) and give it a name such as
FirstLight. AVR Tools will create a file called
FirstLight.avrtools.
To get use same session in the future, you can either
double click on FirstLight.avrtools, or open it from the
AVR Tools File menu.
4. Uploading Firmware
With the Arduino Micro connected to the computer, press on
the Reset button on the Arduino Micro, and
keep the Reset button depressed.
Now, click on the Upload button in the Program tab
of AVR Tools.
Finally, release the Reset button on the Arduino within 8
seconds of clicking on the Upload button.
If everything is working, you should see the firmware being
uploaded, and ending with a window that looks like this:
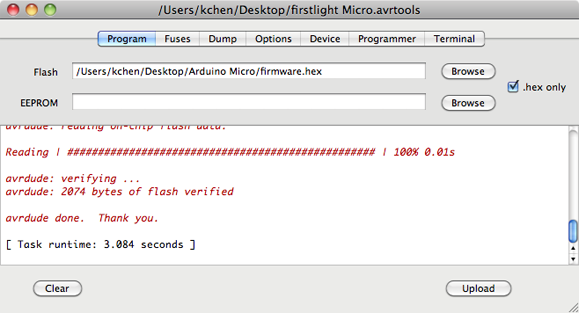
You can use the vertical scroller or change the size of the
AVR Tools window to see more of the response (in red) from
avrdude.
The Arduino Micro should start running you the uploaded
program right after a successful upload. If everything is
working, the yellow LED that is adjacent to the "R" pin of
the Arduino header should be flashing TEST (dah-dit-di di
dit-dah) in Morse code.
If you disconnect the Arduino Micro to remove power from
it, and then reconnect it again, the Arduino Micro should
enter its Bootloader (green LED next to the USB connector
pulsing) for 8 seconds, and the start executing the program
-- the LED should again begin blinking, showing that the
program has been written into Flash memory.
You can now proceed to Lesson 2 to modify the FirstLight
program using Xcode.
Proceed to Lesson 2.