
Compiling and Code Generation using Xcode
Kok Chen, W7AY [w7ay (at)
arrl (dot) net]
Last updated: March 12, 2013
Using Xcode with the
AVR Tool Chain
Be sure to install the CrossPack AVR tool chain by
following the instructions here.
The CrossPack package includes the gcc compiler and library
to support the AVR.
If you intend to develop programs with the Mac OS X
Xcode IDE, you will need to have
installed Xcode. Xcode usually comes as an optional
Developer installation on the Mac OS X installation DVD
that comes with the Macintosh computer. You can also
install the Developer package from the Apple Developer site.
After installation, the Xcode application can be found in
the /Developer/Applications folder.
AVR Project Template for Xcode
There are various Xcode templates that you can use with the
AVR tool chain to do all of your code development (edit,
compile, flagging errors, etc). I have included a set of
Xcode templates that blends neatly with AVR Tools.
Currently, the set includes templates for the ATtiny45,
ATtiny85, ATmega168, ATmega328p, ATmega32u4, and the
ATmega2560.
In pretty much all instances, all you will need to do to
create a new Xcode template for a different AVR device is
to make a copy of one of the above folders, give the folder
the name of the new device (e.g., "ATmega323"), and change
the definition for the MCU variable for the Makefile that
is present in the template folder:
![]()
Or, you can simply tell Xcode to create a new project for
the ATmega168 when you start a new project, and then
locally editing the above line ("MCU=") in the copy of the
Makefile that Xcode generates for your project. You can
change the MCU in the makefile at any time to build a hex
file for a different processor.
The avr-libc manual has a list of
supported AVR devices (MCU).
The set of templates that is provided by AVR Tools assumes
that there is a single file called program.c. If your
program contains other files, you will need to add other
dependencies into the Makefile manually. For example, the
following will include a file uart.c as part of your
project:

To install this set of Xcode templates, download the disk image from here and
then copy the AVR folder from the disk image into the
following folder (which should already be on your hard
disk):
/Developer/Library/Xcode/Project Templates/
Once the AVR templates are installed into Xcode's Project
Template folder, you should see the AVR folder
listed under Mac OS X on the left whenever you ask Xcode to
create a New Project.
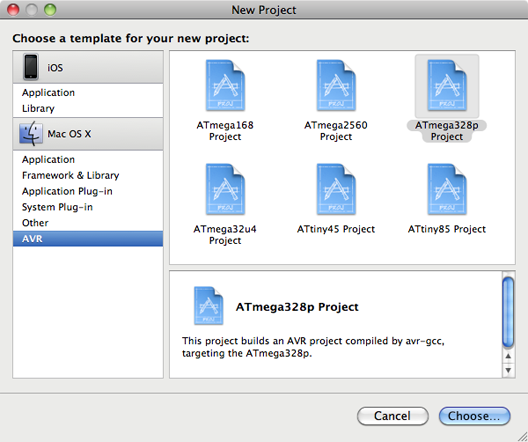
You can simply choose the project template by clicking on
the Choose... button.
When you add more templates for other Atmel devices into
the AVR template folder, they will appear in the panel on
the right of the New Project window.
Building an AVR Project
When you create a new ATtiny85 Project, you should see
something like this:
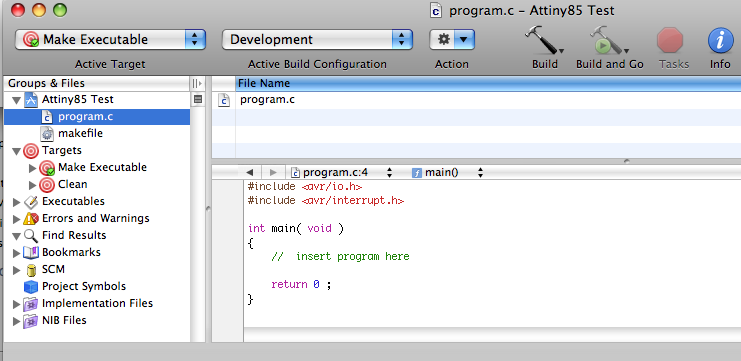
As seen above, a program.c file appears in the
project, so does the Makefile.
Note the Make Executable item in the Active
Target popup menu at the top left of the project
window. This selects the Make Executable target that you
can see in the list view below the popup menu. When you
click on the Build button (the hammer icon in the
Xcode window's shelf), Xcode will execute this target.
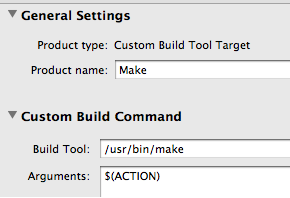
If you double click on the Make Executable target
(the concentric red circles) itself, you will find that
Make Executable simply runs the Makefile
("/usr/bin/make"):
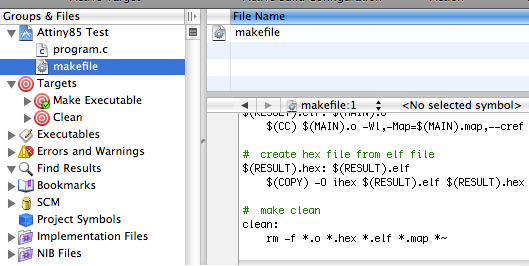
If you double click on the Clean target, you will find
this:
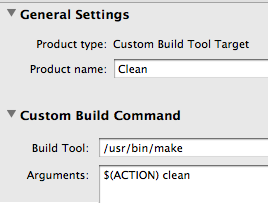
Thus, if you were to change the Active Target menu
to select Clean, clicking on Build will execute
the "clean" objective in the makefile (i.e., "/usr/bin/make
clean") . In the Makefile, you will notice that "clean"
runs the Unix command "rm
-f *.o *.hex *.elf *.map *~", which you can see when
you open the Makefile in the Xcode editor:
i.e., if you select Clean as your Active Target
and click on the Build button, Xcode will run the
Unix command to remove all the files that Make
Executable has created.
You can add other targets that you want, adding more
entries to the Makefile and save the Project as an Xcode
template in the Developer folder. Once you have a usable
Xcode template, adding other templates is as easy as making
changes and saving the Project and name and use it as a
template.