Installing the µH Router
The disk image that contains the µH Router installer can be downloaded from here.
µH Router is a Universal application and requires at least Mac OS X 10.4 (Tiger) and continues to work with Mac OS X 10.5 (Leopard) and MacOS X 10.6 (Snow Leopard).
µH Router is connected to a microHAM keyer through a USB connection. This USB connection emulates a 230,000 baud full duplex serial port using an FTDI chipset. Before using µH Router, please be sure to first install the latest FTDI driver for your specific computer. The router will not function if you don't have a proper FTDI driver in place.
Preferences
Normally, there is no need to launch the µH Router by yourself. The application that uses the router should be able to launch it automatically for you.
If you have not used the router before, you might want to manually launch the µH Router once to set up your own Preferences. A simple test in the Preference panel will also test if the router can send commands to your microHAM device(s).
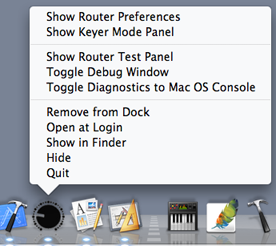
The router is usually run "faceless" with no active windows showing. Clicking the µH Router's icon in the dock will activate the router; you can then access Preferences under the µH Router menu and a simple test panel under the Window menu.
You can also access the two µH Router's panels by control clicking on its dock icon and selecting the panels that you want to open.
The Preferences menu opens a
very simple panel with three tabbed views, one for each
type of microHAM keyers, as shown below.
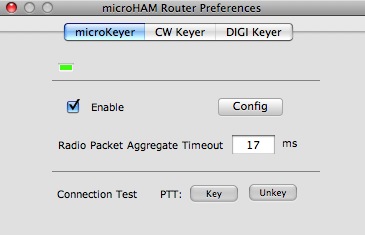
There is a small rectangular
indicator that is grayed out if the device is not
available. The indicator turns green if the device is
available.
If you believe that you have the keyer properly connected
and yet the small box is grayed out, check first to see
that you have installed the proper FTDI driver. Next, check
to see if your computer can actually see the keyer, and
that the USB connection is not faulty.
To check the USB registry, you can use the application
System Profiler in your /Applications or
/Applications/Utilities folder. In the Contents view on the
left of the Systems Profiler window, click on the
USB item under the Hardware selection.
The USB Tree for your computer should be displayed. An
example is shown below:
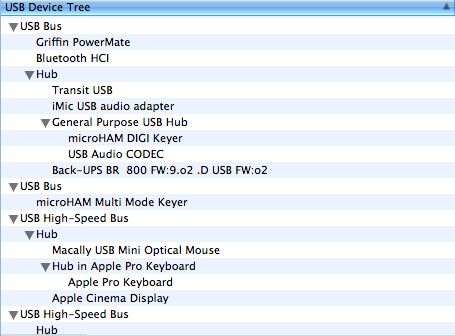
A microKEYER will be enumerated
as a "microHAM Multi Mode Keyer," a microKeyer II appears
as "micro KEYER II," and a digiKeyer will show up as a
"microHAM DIGI Keyer." If your keyer does not show up in
this system registration, the µH Router will also not be
able to find it.
(Note that if you are connected to a microKeyer II or
digiKeyer, the sound cards in those devices should also
appear in the USB tree right next to the serial ports of
the keyers as "microHAM CODEC" or "USB Audio CODEC.")
Enable Checkbox
The Enable checkbox in the Preference panel can be
used to ignore a specific keyer. A second application that
is trying to talk directly to the keyer instead of going
through the µH Router will cause conflicts that will cause
neither application to work reliably. By unchecking the
Enable checkbox, the µH Router relinquishes connection to
the keyer, allowing your other application to have sole
control of the keyer.
The small indicator in the Preference panel will turn
yellow for devices that can be found but are not connected.
If the device is not connected for other reasons than being
disabled in the Preference panel, the reason for it is
displayed to the right of the indicator.
Connection Test
There is a very simple test in the preference panel to
check for actual data connectivity to the device. If power
has been applied to the keyer (the 12 volts fed from the
radio, for example), then the PTT Key button at the bottom
of the preference window should light up the PTT LED on the
keyer, if you have the PTT routing correctly selected in
the keyer settings . If the PTT
line is connected to the radio, your radio should also
key into transmit mode.
Aggregate Timeout Field
When individual bytes arrives at the router from the
microHAM keyer's radio (CAT) port, it is buffered and
stored in the router until a timeout duration expires. The
accumulated buffer is then sent as a single block to the
client application. This can potentially improve the
performance of the client if it is polling for data from µH
Router. This parameter can be tuned to reduce the processor
usage of the client processor (using, for example,
/Applications/Utilities/Activity Monitor).
Config Button
This allows you to set up the microHAM keyer's
configuation. Go to the Keyer Settings page for
documentation on how to configure the keyer to your
preferences..
Other Tests
The router comes with other tests to check out connections
between the keyer and the radio.
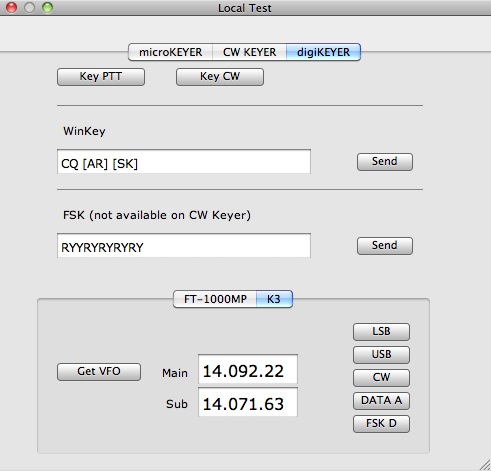
As with the Preference panel,
there are three separate tabbed views in the Test panel,
one for each type of microHAM device.
The first section tests the flags channel to keyer, and
this includes the PTT and serial CW lines. The two buttons
should toggle the PTT and serial CW states of the keyer,
depending on the mode the keyer is in. Please check the
Keyer Settings page to
determine the mode. The CW button is not operational
when the Keyer is in digital moce, for example.
The next section tests the WinKey channel to the radio.
WinKey is a chip that is included in the microKEYER and CW
KEYER. This section of the test panel is grayed out when
you select the DIGI KEYER. The WinKey chip allows
well-formed Morse keying even when you are using a
multitasked operating system such as MacOS X. Pushing
Send should send the text field in Morse if your
radio is set up to transmit in CW mode and operating in
break-in mode (or if you'd first keyed the PTT line). The
WinKey test requires the keyer to first be placed in CW
mode. See Keyer Settings for
information on modes.
The last section only works if you are connected to a Yaesu
FT-1000MP or a Elecraft K3. Do not touch any of the
buttons in this section if you don't have an FT-1000MP or a
K3 connected to the keyer. Each of the mode buttons
should command the CAT function of the radio to switch the
radio to the corresponding modes. The Get VFO will
test the reply from the radio and will display the main and
sub VFO dial frequencies.
Stay Alive
When an application disconnects from µH Router, it has the
option of asking µH Router to quit if no other application
is still connected to the router; this is how cocoaModem
uses the µH Router. When cocoaModem starts, it launches and
connects to µH Router if the user has asked to use a
microHAM device. Just before cocoaModem quits, it
disconnects itself from µH Router and it asks µH Router to
also quit if no one else is connected to the router. There
is a Stay Alive option that forces µH Router to
ignore the "quit if not connected" message.

One use of "stay alive" is for
keeping the UTC clock running in the micrKeyer II's LCD
panel.
Saving your Preferences
Once you are done with the setup procedure, quit the µH
Router application. This will save the "Enable" checkbox
states and all the Keyer Settings to be saved to
a file called w7ay.mH Router.plist in your
~/Library/Preferences folder.