cocoaTemma User's Manual
beta 0.1
Kok
Chen [w7ay
(at) arrl (dot) net]
Last updated: November 27, 2006
Introduction
cocoaTemma is an application for controlling Takahashi
telescope mounts which use the Temma protocol. It is
written for the Cocoa framework and requires at least
Mac OS X 10.4 (Tiger). cocoaTemma is built as a Universal Binary and runs natively on
either Intel or PowerPC based Macintoshes. cocoaTemma is
also AppleScript capable.
For non-commercial use, both the cocoaTemma application and
the complete Xcode project and sources for it can be
downloaded for free from the Downloads page.
Hardware Interface
cocoaTemma communicates with the serial port of the Temma
controller. You will need to be connected to the Temma
controller with either a USB Serial adapter or a Bluetooth
serial adapter.
Files and Preferences
Except for the preference file, all of cocoaTemma's
resources, including the star and deep sky catalogs are
contained in the application bundle itself. The preference
file is a standard MacOS X Property List (plist) file which
is saved under the name w7ay.cocoaTemma.plist in
the Library/Preferences folder of your home directory.
cocoaTemma's preference panel is opened by selecting the
Preferences... item in the cocoaTemma menu in the
Menu bar. You can also open the Preference panel by using
the Command-comma keyboard shortcut.
The following figure shows the opened Preference panel.
There are three tabbed sections -- one tab view to specify
the observer's location (latitude and longitude), a second
tab view to specify the parameters of the Setup window, and
a tab view to define the drive rate during guiding.
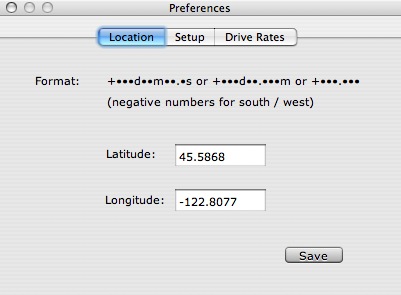
The latitude and longitudes can
be entered with pretty much free formatting. You can for
example enter the angles as decimal numbers, with the
longitude running from -180 degrees to +180 degrees and
with the latitude running from -90 degrees to +90 degrees.
Notice that latitudes south of the equator have negative
signs and longitudes west of Greenwich have negative signs.
The example shown above is the location for Portland,
Oregon, USA.
You can also enter the angle as degrees and arc minutes,
with integer degrees and a decimal number for the minutes.
The latitude shown above could also be entered as
45d35.208m (45 degrees, 35.208 minutes).
You can also enter the angles in degrees, minutes and arc
seconds. The longitude number shown above can also be
expressed as -122d48m25.2s.
The longitude is used for determining the local mean
sidereal time (LST). cocoaTemma extracts UTC time from the
MacOS X system clock and then applies this longitude offset
to compute the local sidereal time.
The latitude value is used when you sync Temma to the
zenith. The latitude and longitude are also used to
determine when a star's or object's location is below the
horizon.
The Save button marks the selected latitude and
longitude numbers for saving into the Preference file when
you next exit cocoaTemma.
The Setup preference view is shown in the next figure.
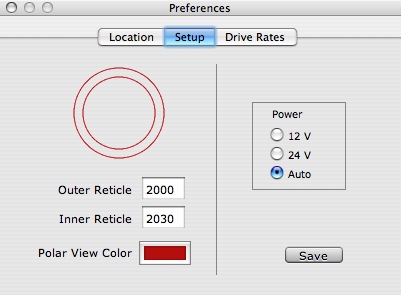
The left part of the window
controls what the polar scope view in the Setup window will
look like.
The polar scope reticle of the Takahashi mount consists of
an inner and an outer circle which determines the
trajectory of Polaris throughout a day for different years.
For the immediate future, the outer circle represents a
lower numbered year and the inner circle represents a
higher numbered year. Depending on the year that the mount
was manufactured, the outer and inner reticle circles could
for example be marked for the years 1985 and 2015. A newer
mount could instead be marked for the years 2000 and 2030.
The years are marked on the reticle itself. These two
numbers can also be found in the Polar Alignment section of
the Instruction Manual that came with the mount.
Double clicking on the Color well will bring up the Color
Picker to chose the background color of the polar scope
view in the Setup window.
The radio buttons in the Power box on the right let you
pick the default power setting. The newer Temma controllers
allow you to use 24 volt supplies to accommodate faster
slew rates. You can select to use either the 12 volt or 24
volt setting. cocoaTemma also provides a third, or
automatic, setting. If you choose Auto, cocoaTemma will
inspect the actual voltage that is returned in a status
reading from Temma. If the actual voltage is greater than
19, cocoaTemma will switch to using the higher voltage.
Finally, there is a Save button that marks the
values in the setup preferences to be saved when you next
exit the app.
The third preference tab view lets you choose the
rate the telescope moves when you use the guide buttons.
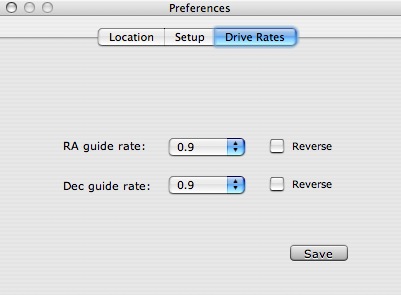
The default value when you
power up the Temma is 0.9x of some nominal rate. The drive
rate preferences lets you choose a rate between 0.1x and
0.9x . It also allows you to reverse the sense of the
slewing buttons in the main window. By default, pressing
the left slew button in the main window will slew the
telescope towards the east. The two buttons marked
Reverse allow you to reverse the sense of the
buttons.
Again, there is a Save button to save these
settings to your preference file when you exit cocoaTemma.
Connection
When cocoaTemma is launched, it reads in three catalogs
from its application bundle. After the splash screen goes
away, you can connect to the mount using the Connect menu.
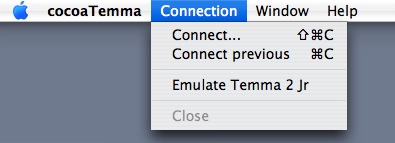
When you select the
Connect... item, you will be presented with a
dialog to choose the serial port:
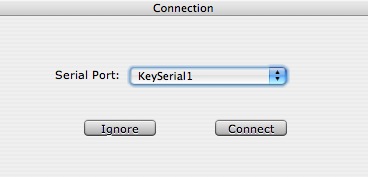
If the expected serial port
does not appear in the popup menu in the connection dialog
panel, click the Ignore button, check the serial port
connection and then try to Connect... again.
Once you have successfully made a connection, you can in
the future use the Connect previous item to
connect to the same serial port. The port that you select
using Connect... is saved to your preference
(plist) file.
cocoaTemma comes with a basic emulator which you can use to
familiarize yourself with the controls before connecting to
a physical mount. If you select the Emulate Temma 2 Jr
item, the Temma Emulator panel will appear:
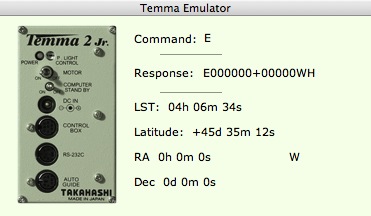
The emulator panel displays the
state of the emulated "telescope mount." The top line
displays the most recent command that is received from
cocoaTemma controller and the second line shows the
response that is sent back.
You can also run an AppleScript that tests the functions of
the emulator and speaking back the results -- this
should give an idea of what cocoaTemma's AppleScript can
do for you.
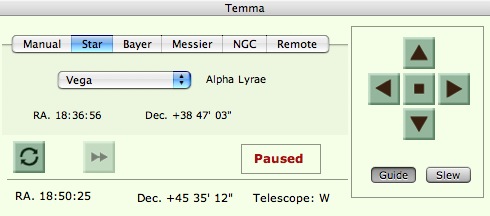
Main window
Once you are connected to the Temma controller (or to the
emulator), you will be presented with the following window:
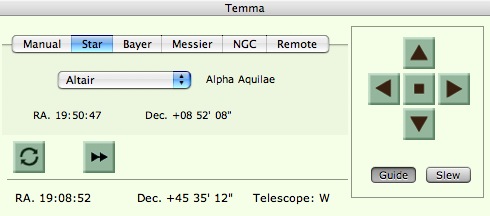
On the left is a tab view for
selecting a coordinate that you can use to direct the
telescope to. The figure above shows the main window with
the menu for selecting from stars with common names. When a
star is selected, the Bayer designation (in this case,
Alpha Aquilae) and the Right Ascension and Declination of
the star are displayed.
The stars' coordinates are not sent to the telescope mount
until you click on one of the buttons below the tabbed
view.
The left button is the Sync
button. The sync command does not physically move the
telescope. It merely instructs the telescope that the
selected star's coordinates correspond to the current
location in the sky the telescope is pointed to. (You can
also sync to the current zenith position in the Setup
Panel.)
The button to the right of the Sync right button
is the Goto button. The goto
command moves the telescope from its current location to
the coordinates of the star. You can abort a goto by
pressing on the stop (center) button in the control box
(described later).
Note: as a
sanity check, cocoaTemma disables and grays out the Goto
button until you've issued at least one sync command,
either from the Main window or from the Setup window.
cocoaTemma polls the Temma controlller for its current
location once a second and reports its location, together
with the side the telescope is relative to the polar axis.
This information is displayed at the bottom of the main
window.
If a selected star is below the horizon, a red "Below
Horizon" warning box appears, and both the sync
and goto buttons are disabled and grayed out, as
shown below:

In addition to selecting the
coordinates of a star, you can manually set the coordinates
by selecting the Manual tab.
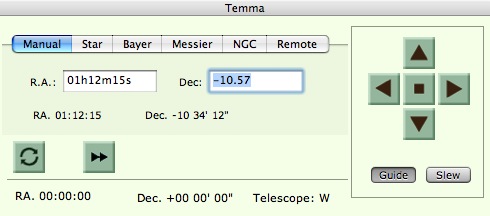
The format for the RA can be
entered in the hour/minute/sec format as shown above, or as
as decimal numbers, e.g.
1.20417
1h12.25m
The format of the declination can be given as a decimal
angle, as shown above, or as degrees, arc minutes and arc
seconds, e.g.,
-10d34.2m
-10d34m12s
Please be sure that you use a carriage return or a tab
character to enter the numbers that you have typed into a
text field.
The Bayer tab allows you to
choose a star by its Bayer designation:
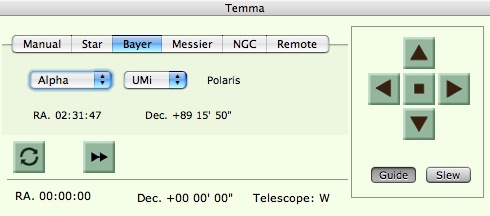
When you select a constellation
(in the figure above, Ursa Minor), the first popup menu
will show the designators (alpha, beta, gamma, zeta, etc)
of stars that have Bayer designators in cocoaTemma's
catalog. If the star also has a common name, it will appear
to the right of the two popup menus (Polaris in the above
figure). If a common name is not found, the displayed
string is the long form Bayer designator for the star.
The Messier tab lets you select
the coordinates of a Messier object:
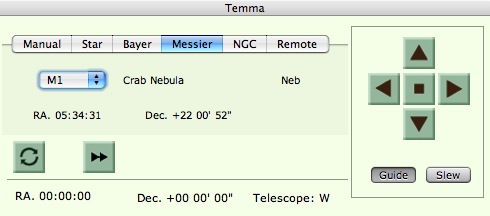
When you select a Messier
object, its name will appear to the right of the popup
menu, together with the deep sky object type (Neb
for nebula, OC for an open cluster, Ast
for an asterism, etc).
The NGC tab lets you select the
coordinates of a deep sky object in the NG catalog:
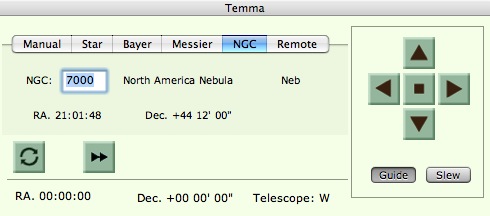
If the object has a common
name, the name will appear to the right of the NGC number
that you have entered. As in the case of the Messier tab,
the object type of the NGC object appears to the right of
the deep sky object's name. The following are possible
object types:

The
Remote tab is automatically
selected when an AppleScript is used to set the location of
an object.
Control Box
The control box for manually slewing the telescope is on
the right of the main window.
Two different rates are provided by the Temma controller, a
guiding rate and a slewing rate. The telescope will move in
the selected direction when one of the directions is
pressed. The telescope will stop slewing the moment that
you release the mouse button. The center "stop" button is
there as a security blanket. The center stop button is also
used to abort a goto command.
The left button moves the telescope towards the east and
the top button moves the telescope towards the north, You
can reverse the direction of the
left/right and up/down buttons in the preferences panel.
Connection Info
Panel
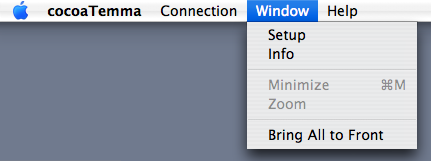
There are two other windows (Setup and
Info) that you can open by using the Window menu
in the Menu Bar:
The
Info window displays the
connection information:

The connection field is the
Unix pathname to the serial port. The version is returned
by the Temma controller, and if it is a known type, the
Takahashi model is displayed. The power field shows the
Temma power source voltage that is measured and returned by
the Temma controller.
Setup Panel
The Setup window is an aid to
quickly set up the mount. It is displayed by selecting
Setup in the Window menu of the menu bar and the display
can be hidden at any time by clicking on the red button at
the top left of its window.
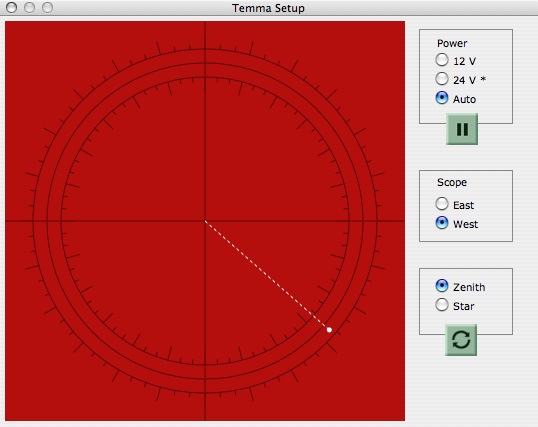
On the left of the Setup window
is a display which mimics what you should see in the Polar
Scope. The inner and outer circles of the reticle are set
by the epochs that are defined in the Preference Panel, be sure to first set
those values to correspond to your Polar Scope before
using this feature.
cocoaTemma calculates where Polaris should appear on this
view based on the current sidereal time and the current
epoch. cocoaTemma maintains a table of Polaris positions
for each decade and interpolates the actual positions from
the table.
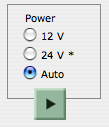
The initial Power selection is based also on the
preferences that are in the Preference Panel.
If you have asked cocoaTemma to automatically choose the
Power selection (the voltage that you supply to power the
mount), it will query the mount for the actual voltage that
the mount senses. If the voltage is over 19 volts,
cocoaTemma will select the 24 volt setting, otherwise it
will choose the 12 volt setting. When you use the auto
setting, the actual setting that cocoaTemma uses with show
a * after the voltage label.
The button under the Power box is a
Pause button. This button stops
the RA motor from running. You can use this button to pause
the motor after using the directional buttons to center the
bubble of the Polar Scope, without having to use the
physical power switch on the Temma controller. When the
drive is paused, the Pause button turns into a
Resume button:
In addition, a red Paused sign
appears in the Main window and the goto button is grayed
out, as shown in the figure below:
Pressing the Resume button will
start the polar axis drive up again.
In addition to the Sync button in the Main window, a second
Sync button appears in the Setup
window below the Zenith/Star box. The Sync button in the
Main window only allows you to sync to a star. The Sync
button in the Setup window allows you to sync either to the
Zenith or to the star that is selected in the Main window.
When you first power on the Temma controller on the
Takahashi mount, the controller defaults to the state when
it thinks the telescope optical tube has been positioned on
the west side of the polar axis. The Scope
East/West selection allows you to change
where the controller thinks the OTA side is when you sync
to a star or to the zenith.
Miscellaneous
When computing whether an object is below the horizon,
cocoaTemma uses a horizon that is +1 degree in elevation.
You can change this by editing the Horizon entry
in the plist file. Use -180 if you don't want cocoaTemma to
place a limit on any object.
Acknowledgments
The Temma protocol comes from the FAX images at Software-y-Ddraig and Rémi Petitdemange's documentation.
The idea for the polar scope view is also taken from
Rémi's Macromedia Flash browser
plug-in.
Some of the other ideas stem from correspondences with Jeff
Terry and with Darryl Robertson of Microprojects.
Appendix A - Object Catalogs
cocoaTemma includes three catalog files in the resource folder of its application bundle. (To open the application use Control-Mouse click on the application and select Show Package Contents from the contextual menu. Navigate into the Contents and then into the Resources folder.)
The three catalog files are
star.hcat - Stars up to 7.5th magnitude (in hcat format, see below) 25,713 stars (2.1MB)
messier.dcat - Messier objects (in dcat format -- see below)
ngc.dcat - Historically corrected NGC objects (in dcat format) 7,840 objects
These three catalogs are built from publicly available data with an app called BuildCatalog that I had written. Please write to me if you would like a copy of the BuildCatalog Xcode project (for example, to get stars that are dimmer than magnitude 7.5).
star.hcat has data corrected to J2000.0 and each line has the following format (the fields are separated from each other by an extra space character):
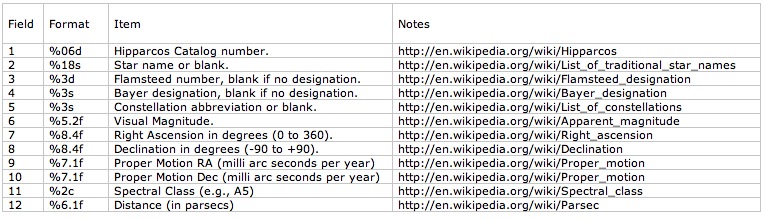
Example
011767 Polaris UMi
Alp 1 1.9 37.9461 89.2641 44.2 -11.7 F7 132.3
messier.dcat and ngc.dcat have data corrected to J2000.0
and each line has the following format (the fields are
separated from each other by an extra space
character):
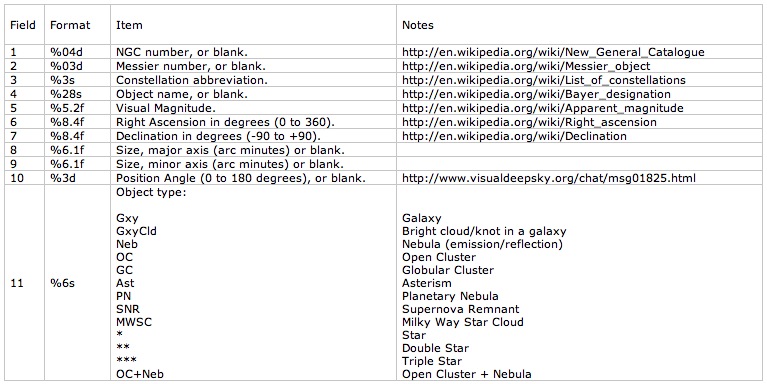
Example
0224
031 And Andromeda Galaxy 3.5 10.6846 41.2679 180.0 63.0 35
Gxy
Hipparcos data were obtained from the
I/239 data base at the CDS site. NGC data were obtained
from the Historically Corrected NGC Data. Star
names came from the HYG Database and Deep Sky object names come from the
SEDS site.