MountSim![]()
Kok Chen (email: chen [at] w7ay [dot] net)
May 22, 2020
Updated: June 19, 2021
Introduction
MountSim is a MacOS X application that simulates Equatorial Mounts.
Unlike existing mount simulators, MountSim also draws an image of the sky that is centered at coordinates of the virtual mount. A fixed camera that is pointed at the MountSim window simulates a camera that is mounted on a real equatorial mount. Different parts of the sky are drawn in the MountSim window so that the images from the fixed camera simulates the behavior of a camera that is pointed to different parts of the sky.
This allows closed loop testing of plate solving, polar alignment, auto Meridian flip, autoguiding, etc in systems such as the ASIAIR.

The photo above shows an ASI174MM-Mini camera (foreground) that is pointed at the computer's screen (Apple Cinema Display) that is running MountSim.
The camera is connected to an ASIAIR, and the output from the camera is displayed on an iPad Pro (bottom left) that is running the ASIAIR iOS app. The virtual mount's coordinates are controlled by the ASIAIR. MountSim can also be controlled by SkySafari when the latter is connected to one of ASIAIR's mount proxies.
The effective focal length will depend on the actual focal length of the camera lens and the distance of the camera from the Macintosh display. When using the ASIAIR, the effective focal length of the "imaging train" can be obtained by using plate solving.
Currently, MountSim simulates the RainbowAstro RST mount, the Avalon StarGO controller, the iOptron CEM25, CEM40, CEM60, CEM70, CEM125, GEM45, SmartEQ, SmartEQ Pro and ZEQ25 mounts, the Meade LX-200 Classic protocol, the SkyWatcher SynScan and EQMOD protocols, and the Celestron AVX, CGE, CGEM and CGX mounts.
The stars that are drawn in MountSim are obtained from the HYG 3.0 and TYCHO2 catalogs (note: galaxies are not drawn since they are not in the star catalogs). The HYG catalog consists of stars up to 9th Magnitude, and MountSim includes the TYCHO2 stars up to Magnitude 13.5. The dimmest magnitude star that is drawn is a user settable option.
Requirements
MountSim is a 64 bit MacOS X (Cocoa) application that should run on modern Macintoshes (including the Apple Silicon Macintoshes through Rosetta 2).
To simulate a mount, the computer that MountSim is running on has to be connected to the client (e.g., ASIAIR, INDIGO Sky, or another computer) by using a USB "null modem." Both ends of the null model needs to be USB Type A connectors, so that they plug in both the client and the computer that is running MountSim.
An example of a null modem is this one (FTDI chipset) that is available at Amazon:
https://www.amazon.com/gp/product/B08FBCQ59C
For my testing, I have been using an ASI174MM-Mini camera, together with a Fujinon HF35HA-1B C-mount lens that is stopped down to about f/16.
The camera is configured as either a Main camera (for testing meridian flip and plate solving), or as a Guide camera (for testing autoguiding) on a client like ASIAIR. A lens with low geometric distortion is essential to stress test plate solving. Longer focal length lenses will work, but the camera has to be mounted further from the computer's display to avoid geometric distortion.
https://www.fujifilmusa.com/products/optical_devices/machine-vision/2-3-15/hf35ha-1b/index.html
The Fujinon lens is meant for industrial robotic vision. It has a native focal length of 35 mm, with image circle that can support a 2/3" camera.
Download And Files
The disk image for the MountSim application can be downloaded from here:
http://www.w7ay.net/site/Downloads/MountSim/MountSim.app.dmg
Double click on the downloaded disk image (dmg) file, and simply drag the application to a folder on the Macintosh.
The star database is self contained in the Resource folder of the application bundle.
Although MountSim is code signed with my Apple Developer ID, on newer macOS, MountSim may require security preferences to be relaxed for the first time the application is launched (see https://support.apple.com/guide/mac-help/open-a-mac-app-from-an-unidentified-developer-mh40616/mac). After launching MountSim for the first time, the security preferences can be tightened back up; MacOS will remember that MountSim has permission to run from that point on.
The complete Xcode project with sources can be found at:
http://www.w7ay.net/site/Downloads/MountSim/MountSim.proj.dmg
MountSim creates a preference file at ~/Library/Preferences/W7AY.MountSim.plist
MountSim windows
MountSim has a main window and a number of utility windows.
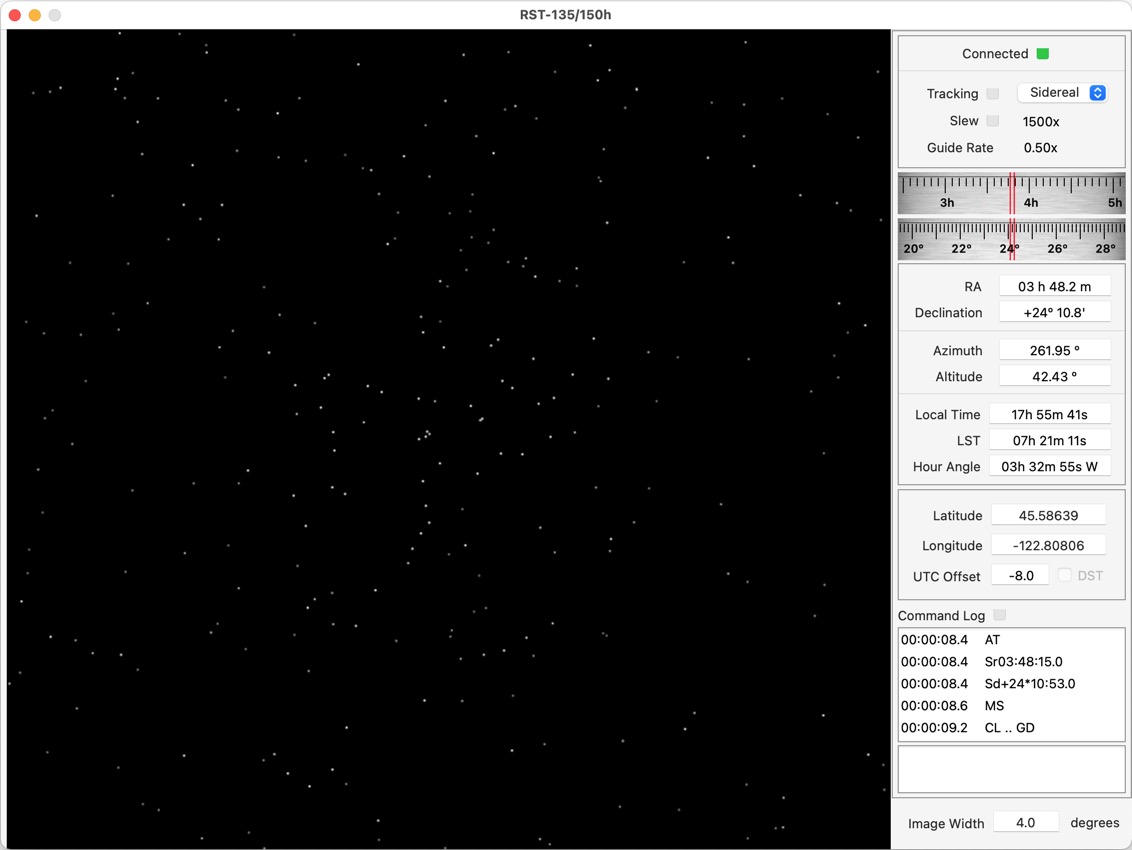
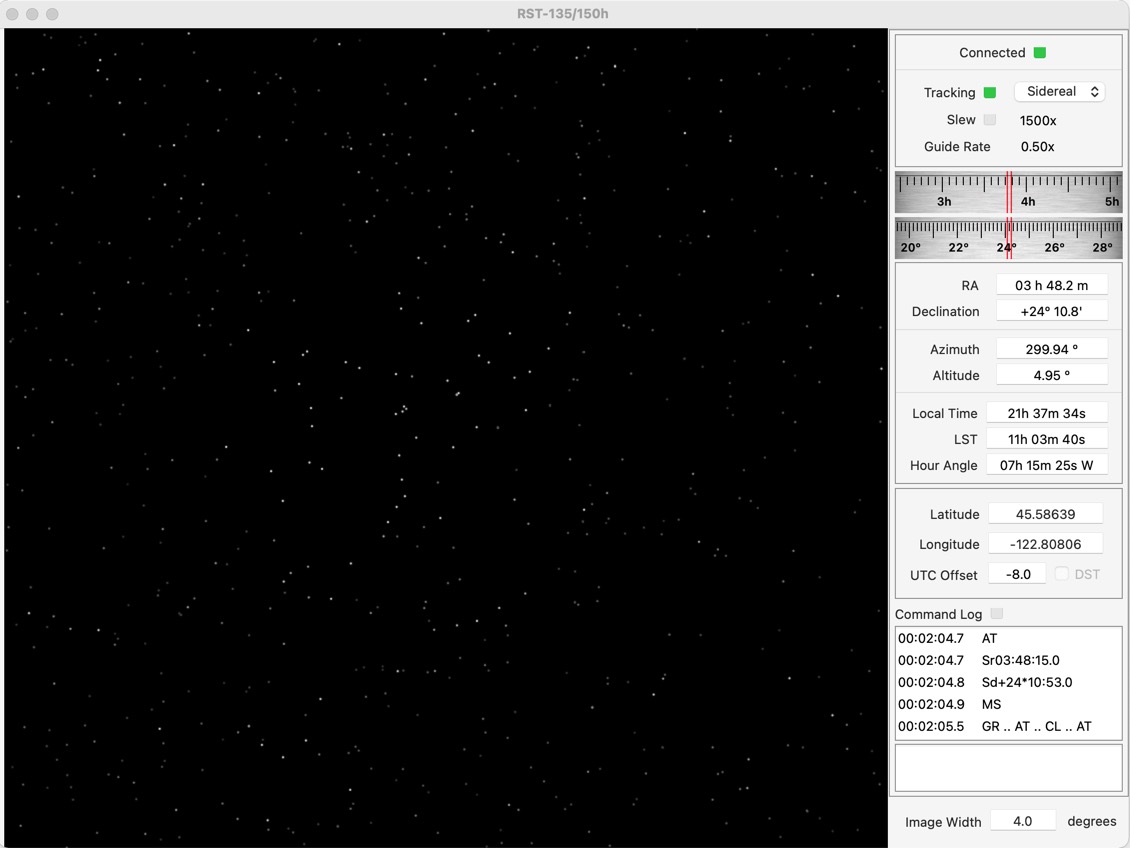
The main window's title shows the name of the selected mount type.
The left side of the main window shown above is the view of the sky that is centered on the mount coordinates (presently set to the Pleiades), with the magnitude limit set to 10.5. It represents the gnomonic tangent plane of the sky that is centered at the RA and Declination coordinates at the center of the view.
The right side of the window shows the mount parameters. Notice that the RA and declination fields correspond to the Pleiades. Hour Angle and Local Sidereal Time fields gives the indication to the internal coordinates of the mount.
The Latitude and Longitude text fields allows the current latitude and longitude to be changed. Changes are saved to the user preferences (plist).
The lower right of the window has a short log of the most recent mount protocol commands that are received from the client. Sr and Sd are for example commands from ASIAIR to set the RA and Declination in RainbowAstro protocol, and MS is the command to move to that coordinate. The empty box below the Command Log is used for text alerts, for example when Meridian Limit or Horizon Limit has been reached, or when a GOTO command requires a Meridian flip.
The width of the image view is set by the parameter at the bottom right of the screen. The image width can be changed in real time to change the FV as seen by the camera.
In the image that is shown above, the width of the view of the sky is set to 4 degrees. Depending on the focal length of the lens and distance it is located from the computer display, the fixed camera will typically show a smaller portion of the sky display, for example a 3º by 2º region.
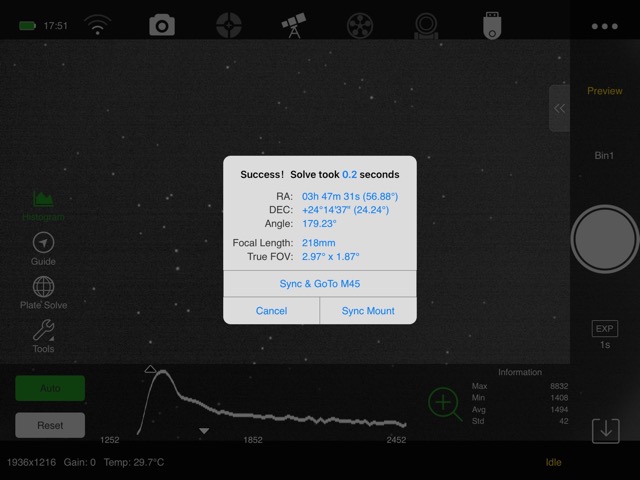
The equivalent focal length of the camera system can be obtain from plate solving the view; shown below using ASIAIR's plate solve facility. Notice that unless the screen is infinitely far away, the effective (plate solved) focal length will always be greater than the native focal length of the lens. In the case below, a 35mm lens yielded an effective focal length of 218mm.
The following shows the same view that is centered on the Pleiades, but with the width (bottom right of window) set to 12 degrees:

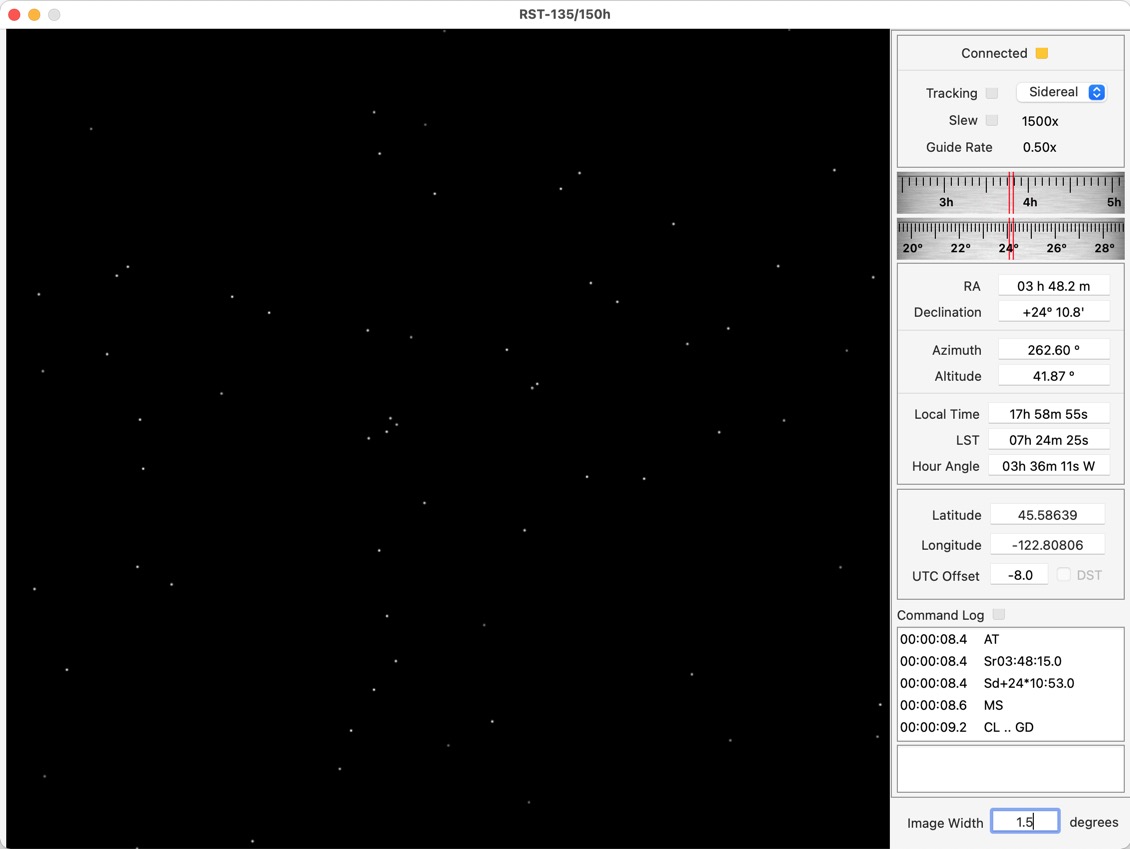
The following figure shows the view set to a width of 1.5 degrees:
Other Windows
The utility windows are available under the Window menu of the application Menu bar:
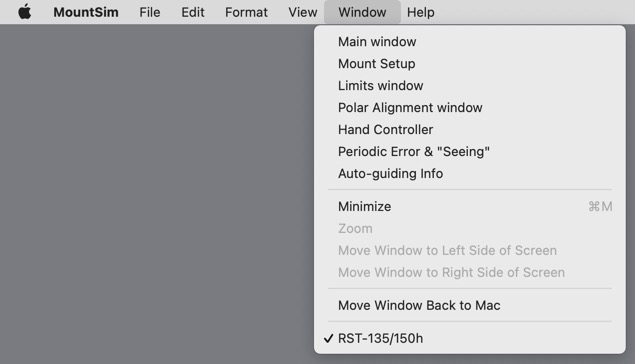
Mount Setup (Model, Serial Port Selection, Star Catalog)
When MountSim is launched, the Mount Setup window automatically appears as a separate window:
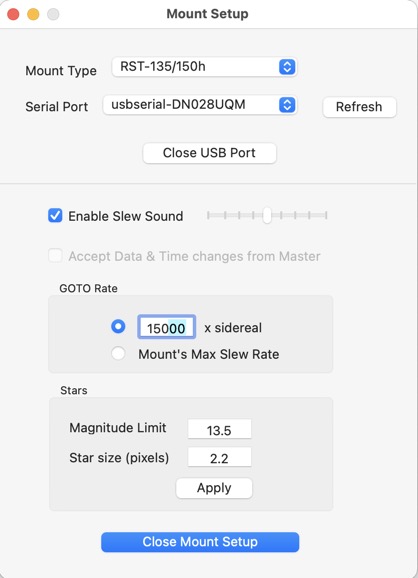
This Mount Setup window can be re-opened later to change the various parameters, by selecting Mount Setup in the Window menu.
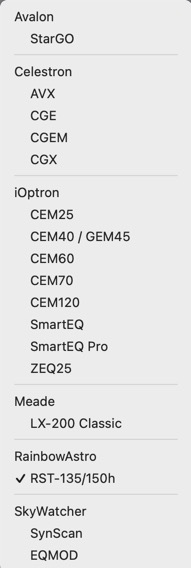
The simulated protocol is selected from the Mount Type popup menu at the top of the Mount Setup window:
The FTDI USB serial port is selected from the Serial Port popup menu. If the port is plugged in after MountSim has already launched, click on the Refresh button to obtain the updated list of available serial ports.
The Open Serial Port button connects MountSim to the client, and also closes the Mount Setup window. Reopen by using the Window menu in the Menu Bar.
The Enable Slew Sound checkbox enables or disables the "motor sound" on the computer speaker when the mount is commanded to slew or to execute a GOTO command. The Slew Sound slider controls the volume of the sound.
The speed of GOTO can be set and selected in the GOTO Rate box. If selected, MountSim will use this speed instead of the mount's own GOTO speed. By setting it to a large rate (like the 15000x sidereal rate shown above), the virtual mount would move faster than a real mechanical mount, to save testing time.
The Magnitude Limit is the limit of the magnitude for stars that are drawn. MountSim's built in star database goes down to Magnitude 13.5, but that amount of stars can confuse plate solve algorithms when using a large FOV. The Pleiades image above is shown with Magnitude Limit set to 10.5.
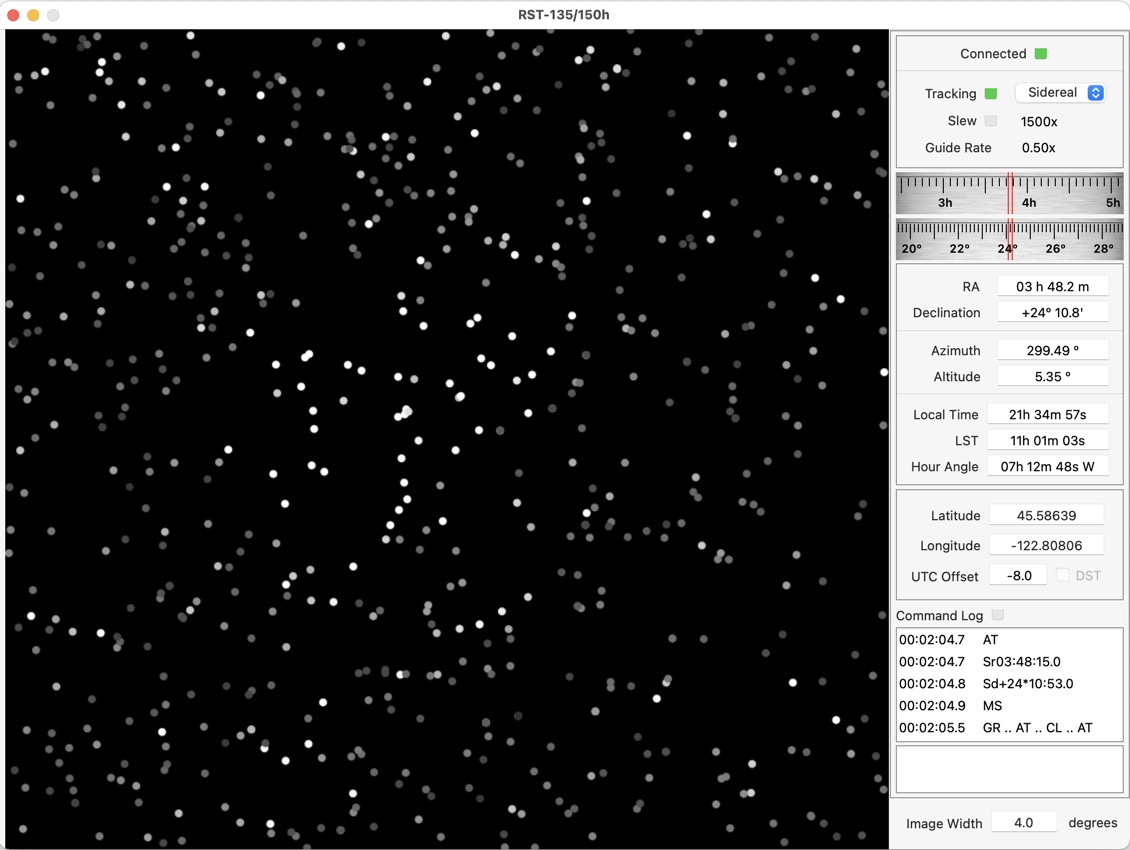
This is an example of the Magnitude Limit set to 13.5, with a Star Size of 2.2 pixels:
Note that the star size refers to the pixel diameter of a circular disc on the MountSim screen. The star size in terms of the pixel size on the sensor will depend on the plate scale (focal length of lens and how far it is from the computer display).
There is no attempt to create a blur radius or any kind of point spread model of the point spread function of a real lens (this could be a future enhancement; for testing HFD algorithms). There is also no attempt made to scale the intensities of the stars as a function of the star size (stars that are drawn with larger star sizes with appear to be brighter).
Here is the same star field with Star Size set to 8 pixels:
The Magnitude Limit and the Star Size can be modified on the fly when MountSin is already running, by clicking the Apply button.
The Close Mount Setup button lets you close the Mount Setup window without changing the open or closing the USB Serial port.
Limits Window
After connecting to a client, MountSim limits can be set in the Limits window:

When tracking, the virtual motor will stop when the Meridian Limit is reached (and additionally, it will execute an auto Meridian flip if the "auto flip" checkbox is set). A GOTO command will not execute if the target of the command is below the Horizon Limit.
To disable the Meridian Limit (i.e., not stop tracking, or to allow the client to control the Meridian limit), set the Meridian limit to some large positive value, and uncheck the auto flip box. To disable the Horizon limit, set the Horizon Limit to a large negative value.
Note that MountSim assumes that the virtual mount follows the movements of a German Equatorial Mount. Like most mounts, slewing across the Meridian is permitted even if it violates the Meridian Limit. However, a GOTO that crosses the Meridian will perform a "German mount flip" path through the pole.
Like the behavior of most mounts, tracking is turned on after a GOTO is completed. Tracking is turned off once a slew (move) command is received.
Polar Alignment Window
The Polar Alignment window models the mount's altitude and azimuth adjustments when polar aligning a mount.
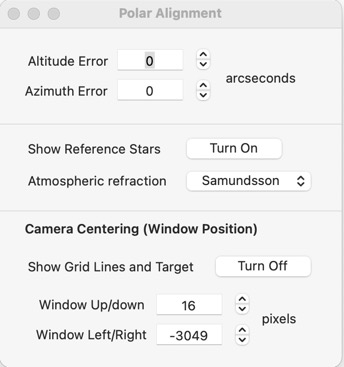
Unless otherwise changed, the polar axis of the mount is assumed to be perfectly aligned with the pole. The Altitude Error parameter moves the altitude relative to the Latitude of the observer. The Azimuth Error parameter moves the azimuth relative to true North.
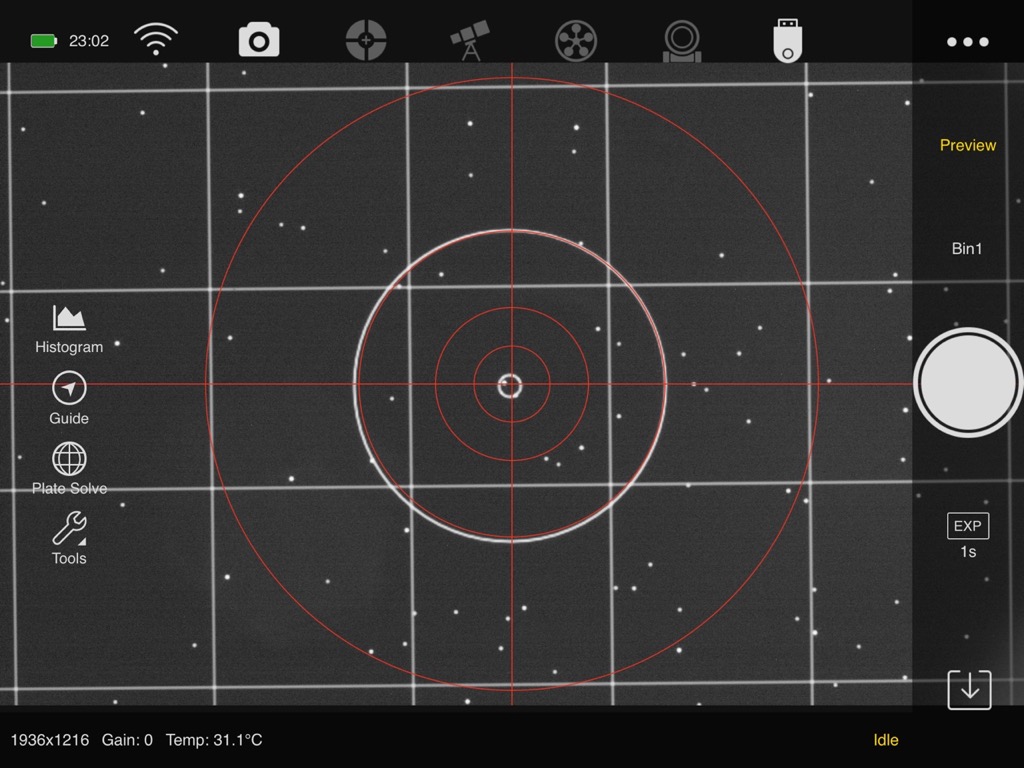
Turning on Grid Lines in the Camera Centering box will draw grid lines across the view. This allows the Camera's optical axis to be mechanically adjusted to line up with the precise center of the view. This step is needed when testing polar alignment algorithms. Alignment of the optical axis is also needed when measuring plate solving accuracy; and also to time the transit of a star during Meridian flips.
The center of the view is drawn as two concentric circles. The image below shows how the camera optical axis is aligned by centering the crosshair of ASIAIR (red lines) to the center of the sky display (the white lines). Cone error can be modeled by pointing the camera away from the actual center of the sky display. The parallelism of the grid lines with the horizontal crosshair of ASIAIR determines if the tripod or pier is level with the horizon.
Depending on the MountSim window size relative to the size of the computer display, the MountSim window can be moved left to right and top to bottom by using the Window Up/Down and Window Left/Right fields. This allows you to align the camera's optical axis very precisely.
Show Grid Lines must be turned off again before attempting to perform any activity that involves plate solving.
The position of the stars are corrected with Precession and Nutation from the epoch of the HYG 3.0 and TYCHO2 databases (J2000) to the current epoch (JNOW), where JNOW is referenced to the Julian date at the time MountSim is launched.
Atmospheric refraction (Samundsson model) is applied in real time to each star individually as a function of its altitude. When testing plate solving refraction correction, the Atmospheric Refraction can be turned off by selecting None in the pop-up menu instead of Samundsson.
Show Reference Stars makes a copy of the stars on the sky display at the time the feature is first turned on, and drawn as a static layer. This allows one to see the drift of stars over time when tracking is not perfect, and to see field rotation when polar alignment is not perfect. During normal use, Show Reference Stars must be turned off to avoid a double image of the stars.
Hand Controller Window
The Hand Controller allows one to move the RA and DEC (or HA and DEC) to a fixed location:
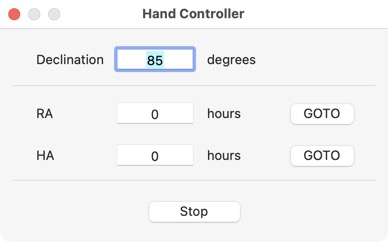
The virtual mount will move along a minimum distance path to reach the target. If the target is on a different side of the pier, the virtual mount would perform a Meridian flip to get to the target.
Periodic Error & "Seeing" Window
The Periodic Error & "Seeing" Window allows you to add mount error and atmospheric turbulence to the star display.

The Periodic Error adds a sinusoidal offset to the RA coordinate of the stars. The peak-to-peak amplitude and period of the error is set in the Periodic Error (sinusoid) box. The periodic error of most mounts, especially the Harmonic Drive (strain wave gear) mounts, are sinusoidal in nature with usually a small third harmonic term and less of the other harmonies.
Additionally, a Gaussian noise term can be sent added to the stars with the RA Jitter and Dec Jitter fields in the Mount box.
There is also a checkbox for MountSim to disable guiding (i.e, ignore mount move commands with a slew rate of less than 1.01 times sidereal rate). This prevents autoguiding from correcting periodic errors, and therefore allows us to see the centroid(s) of stars in the guiding graph.
Separate independent Gaussian noise can also be applied to each Star. This simulates the star position movement that is caused by atmospheric turbulence ("seeing"). Equal noise variance are added to the RA and Declination of a star. Since each axis receives a Gaussian noise, the result of applying independent noise to both axis produces a radially symmetrical probability density function that is Jointly Gaussian (i.e., the star "bloats" randomly). Additionally, scintillation can be approximated by applying a noise term to reduce the stellar magnitude of each star independently.
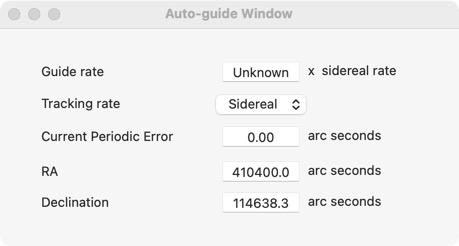
Autoguiding Info Window
The Autoguide Info Window allows you to monitor the autoguiding state of the mount, including the periodic error mentioned in the previous window.
Computer Display
It is best to use a computer display that has as high a resolution as possible, so that star shapes are closer to ideal. My own standard setup consists of a iPad Pro (264 pixels per inch) that is used as a SideCar display for my Mac computer. When multiple displays are present, MountSim will choose to move its main window to the secondary display. My own set up consists of 24" and 27" displays, with the SideCar display as a third display, and MountSim will choose the SideCar display.
This is my current setup:
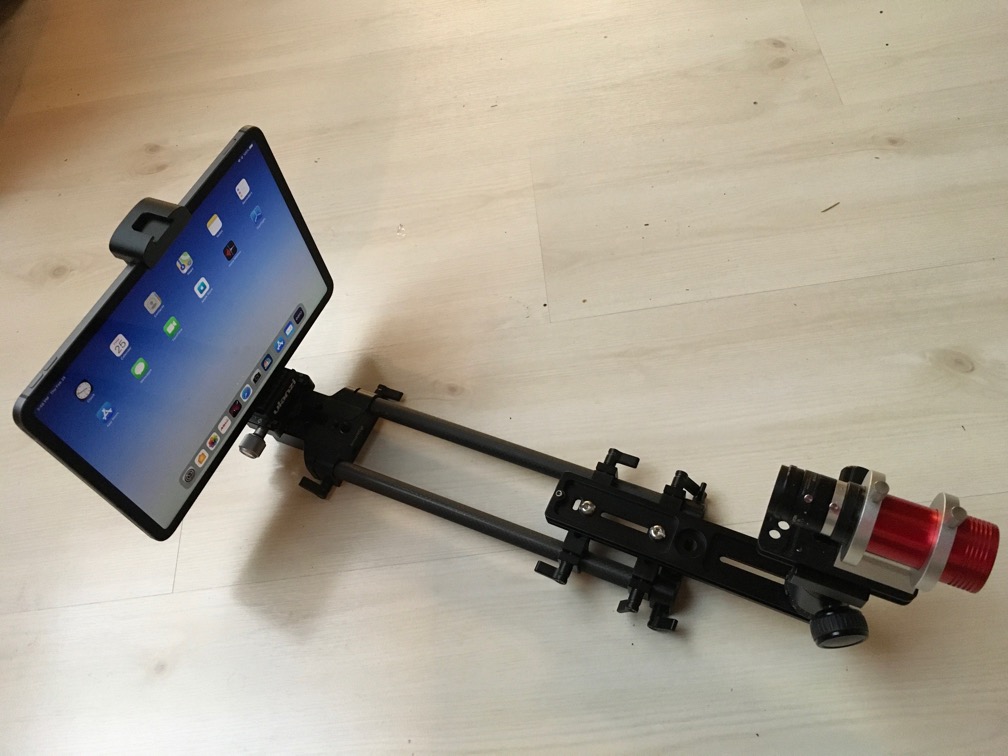
The SmallRig 15mm camera rails and camera mounts, and Swiss ARCA plates are used to mount an iPadPro and a ASI174MM-mini camera at the two ends. The camera rides on a tripod ball mount (so that its axis can be aligned to MountSim's display center.
The assembly is covered by a cardboard box with an additional "focusing hood" (used by photographers to shield sunlight) over everything. Even with the light shield, Infra-red from a Halogen ceiling lamp still leaks through, so I have also added a Baader Neodymium filter (blocks IR all the way past 1200nm) to the camera lens. The filter also helps eliminate any hot spots in the display itself.
Updates
v1.1 added Avalon StarGO; SYNC support (e.g., Sync And GOTO in ASIAIR); allowed atmospheric refraction to be turned off/
v1.2 added CEM70, timed guide commands (e.g., :Mw1000# in iOptron).
Final Notes and Acknowledgements
MountSim is an equatorial mount simulator which includes a view of the sky that the mount is pointed to. This allows a fixed camera to be pointed at MountSim's window, and the images that are captured by the camera look as if they come from a camera that is mounted on an equatorial mount that moves to different locations in the sky.
As a result, MountSim can be used to confirm dependencies of plate solving, polar alignment, auto meridian flips that are caused by polar alignment errors of a mount, for example. Additionally, periodic error and atmospheric turbulence can be added to the star images to test the effectiveness of autoguiding algorithms.
Mount protocol errors (for example, Daylight Saving Time error) from the client can also be discovered, but obscure protocol errors from a client is best found by breakpointing or inserting debug messages into the MountSim Xcode project itself.
Most of my testing of MountSim is through the RainbowAstro protocol. The other mount types are thus less debugged.
My thanks to Mr. ByoungJun Jeong for suppling me with the RainbowAstro communication protocol. The protocols for other equatorial mounts were obtained from open documents that are found on the web.
The HYG 3.0 star catalog is obtained from published files by astronexus on GitHub. The TYCHO2 star catalog is obtained from the Harvard University web site. The catalogs are first digested to only include the needed data (Hipparcos number, HD designation, HR designation, Right Ascension and Declination, proper motion, and stellar magnitude) and combined into a single resource file in the MountSim application bundle.
Kok Chen
June 14, 2021
Portland, Oregon, USA